UTC

Jet Eye Master
PX221 MHR heavily tuned, PX200 O tuned, PX181 M1XL tuned, PX166 tuned a quite bit and some motorbikes
Joined: UTC
Posts: 5465
Location: London UK
 
Jet Eye Master
PX221 MHR heavily tuned, PX200 O tuned, PX181 M1XL tuned, PX166 tuned a quite bit and some motorbikes
Joined: UTC
Posts: 5465
Location: London UK
UTC quote
Don't worry there is always going to be a grinding option

You need to take the engine out. You need to take the cylinder off. You need to take the flywheel off.....so 10 minutes more, take the side casing off and change the driveshaft!

Forget about bearings (unless obviously gone) but new cruicform and clutch side seal would be a good idea. You can check the engine for any Indo bodgery while you're in there.
OP
@charlieman22 avatar
UTC

Nedminder
62 VBB1T Round Tail W/ leaner sidecar
Joined: UTC
Posts: 4927
Location: california
 
Nedminder
@charlieman22 avatar
62 VBB1T Round Tail W/ leaner sidecar
Joined: UTC
Posts: 4927
Location: california
UTC quote
Quote:
I have calipers I cut the 'inner' points off to get in there.
Ahh - thanks Ginch. Now recall reading that previously. Seems doable. Got it.
Quote:
so 10 minutes more, take the side casing off and change the driveshaft!
Chuckle - ik, ik. It's coming - just not quite yet if the motor doesn't end up on the bench. If it does - all bets off. When I split - I'll wanna optimize gearing (4th seems tall with my current set up). Part of reticence here revolves around getting right parts in stock so I'm not left disassembled for two weeks waiting - e.g. shims, slightly shorter 4th gear plug and play if it exists, etc.

Near future - will take a stab at a parts list that perhaps you guys can help massage to avoid lusso this and Cosa that with 3rd gear 1.5mm above gasket surface and V shaped second gear notch thingy confusion...

Tilt engine - pop on new jug - take a few measures for practice - perhaps a nip or tuck here or there - and ride - plan A.
Quote:
Don't worry there is always going to be a grinding option
Would be open to some crafty grinding or decking to optimize a bit as per SoCal/Jack - will need to find machine shop in my area if decking required; of course hoping to get job done all in my own garage with dremel and beer if feasible.

Thanks for input!
OP
@charlieman22 avatar
UTC

Nedminder
62 VBB1T Round Tail W/ leaner sidecar
Joined: UTC
Posts: 4927
Location: california
 
Nedminder
@charlieman22 avatar
62 VBB1T Round Tail W/ leaner sidecar
Joined: UTC
Posts: 4927
Location: california
UTC quote
Home.
jet lagged.
What's a guy to do - 'cept brew some coffee and tinker with box of new parts.

Note: Answer to that question might have been - go for early morning drive on Mulholland to catch sunrise - if said man had not taken dremel to all available spark plugs...

Bit more careful inventory of parts.

Couple follow-up questions to the experienced as I prep:
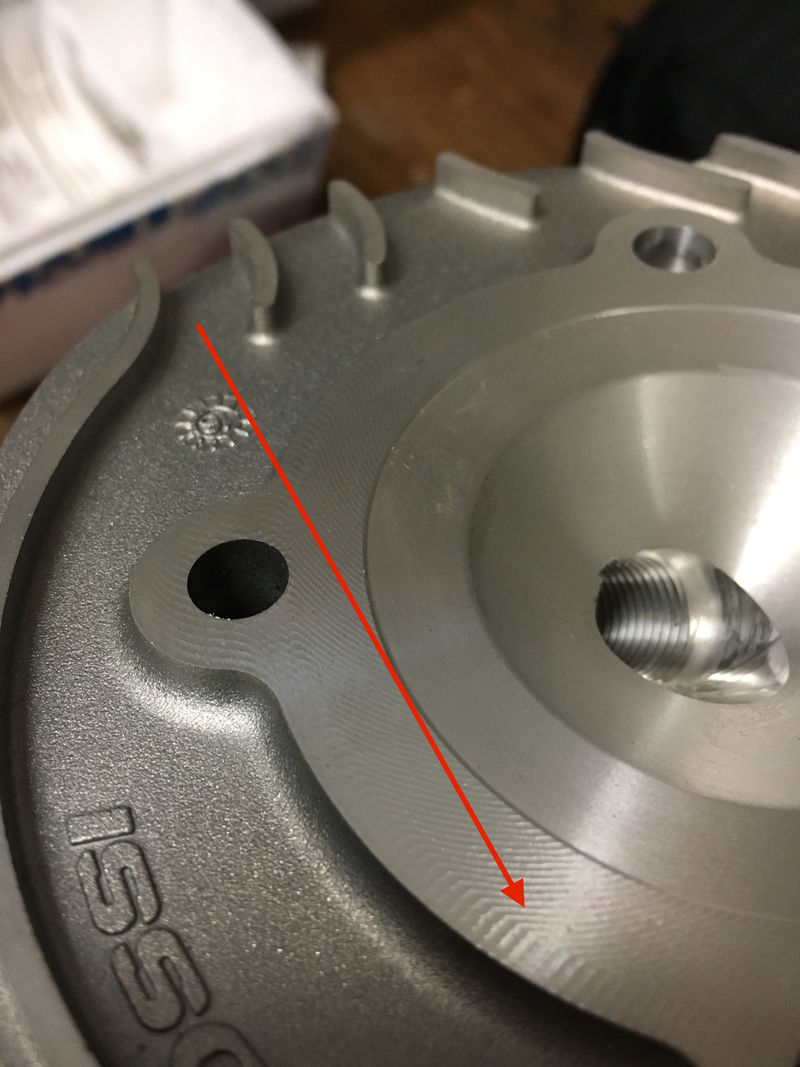
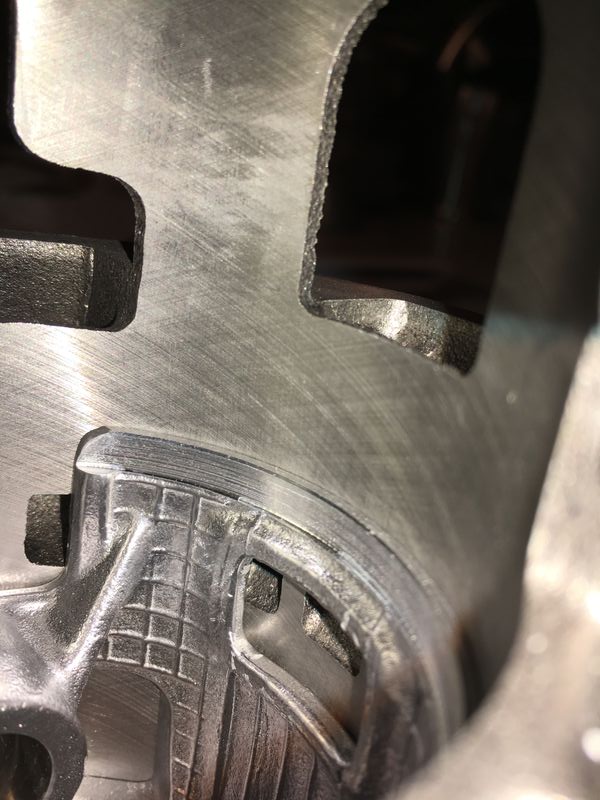
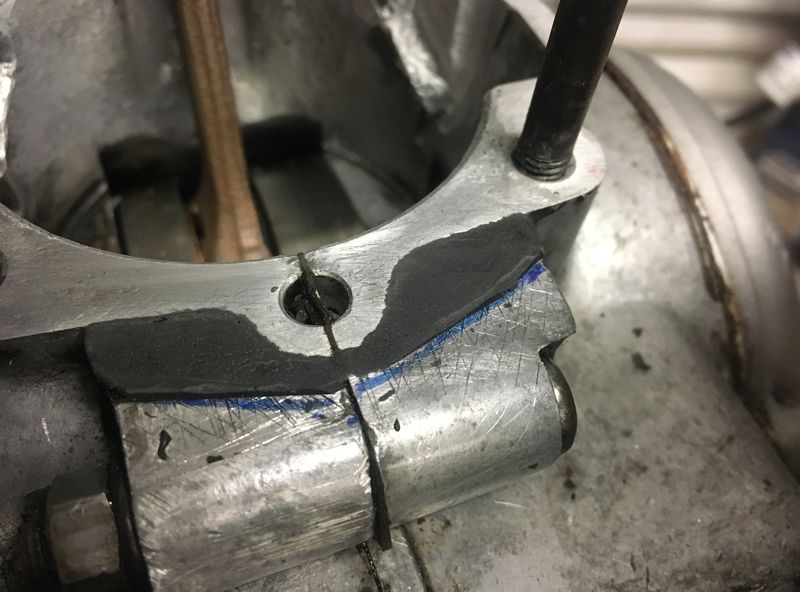
- Does one lap the head to remove machining marks prior to use? - see pic
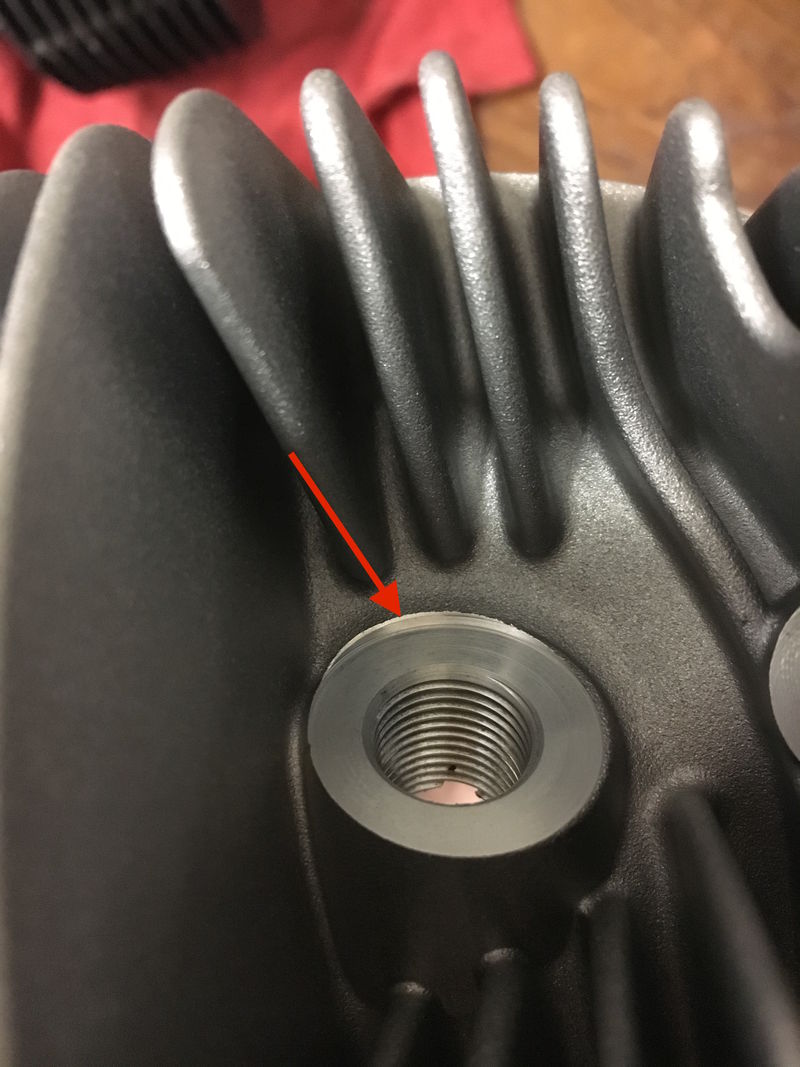
- See plug entry - lip looks like it might interfere with CHT washer. Do you guys leave this alone or make attempt to clean it up with some kinda Houdini grinder work to remove? see pic
- All edges on cyl ports - very sharp - use dremel and hand tools as needed to chamfer all edges (360?) Welcome any little tidbits before I switch on dremel.

Fun one!
Thanks!

-CM
Raised edge at arrow - does anyone bother to remove?
Visible machining marks - does one have to lap this out completely?  not bother at all?
Visible machining marks - does one have to lap this out completely? not bother at all?
UTC

Jet Eye Master
PX221 MHR heavily tuned, PX200 O tuned, PX181 M1XL tuned, PX166 tuned a quite bit and some motorbikes
Joined: UTC
Posts: 5465
Location: London UK
 
Jet Eye Master
PX221 MHR heavily tuned, PX200 O tuned, PX181 M1XL tuned, PX166 tuned a quite bit and some motorbikes
Joined: UTC
Posts: 5465
Location: London UK
UTC quote
Need a few measurements ( all ports to the top in 0.00mm )and pictures of the cylinder to see what its like.

Head is rough but something will could need skimming anyway, so keep the smoothing until later. CHT ring wont worry about that lip, if it bothers you grind it off. When you get a spark plug, test it to see how deep it goes with the ring on, as with recent experience, too far in overheats the plug and ends not well.

Only chamfer ports top and bottom. Doing the sides can make the rings wear more not less.
OP
@charlieman22 avatar
UTC

Nedminder
62 VBB1T Round Tail W/ leaner sidecar
Joined: UTC
Posts: 4927
Location: california
 
Nedminder
@charlieman22 avatar
62 VBB1T Round Tail W/ leaner sidecar
Joined: UTC
Posts: 4927
Location: california
UTC quote
Jack - good stuff.
- Save the decking for when we know squish - then knock it out in one. Like that approach.
- Glad I asked on chamfering of holes. Now can envision how rings would try and deform in to ports unnecessarily with chamfer's on sides. Top and bottom only - makes sense.
- Plug will actually be long thread - Had a look at it today. Plan to play around with indexing spacers to experiment with optimizing ground electrode position in chamber.

Measures and pics to follow.
Tks.
-CM
OP
@charlieman22 avatar
UTC

Nedminder
62 VBB1T Round Tail W/ leaner sidecar
Joined: UTC
Posts: 4927
Location: california
 
Nedminder
@charlieman22 avatar
62 VBB1T Round Tail W/ leaner sidecar
Joined: UTC
Posts: 4927
Location: california
UTC quote
Ok - Here are the scores on the doors:
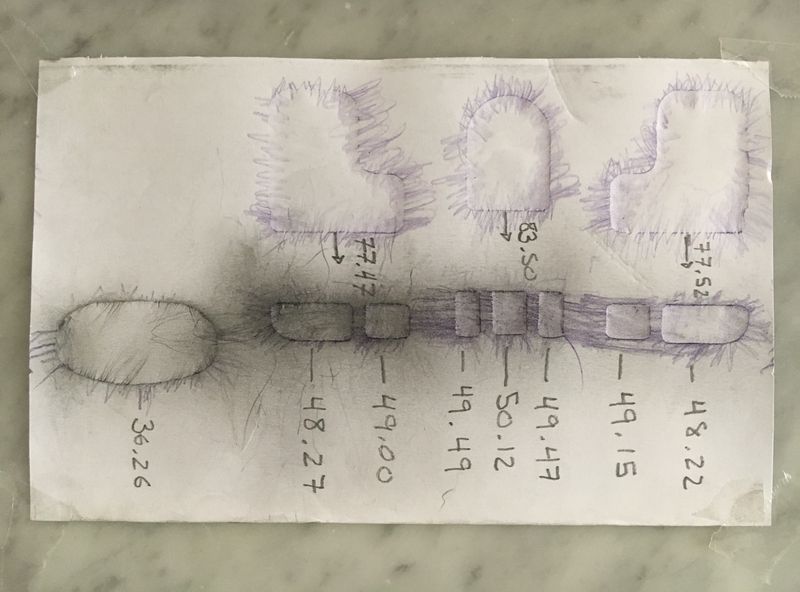
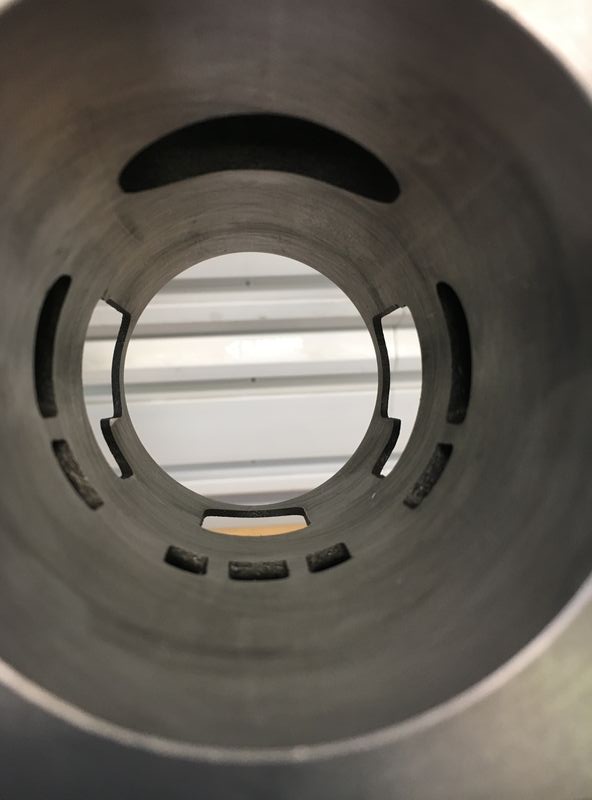
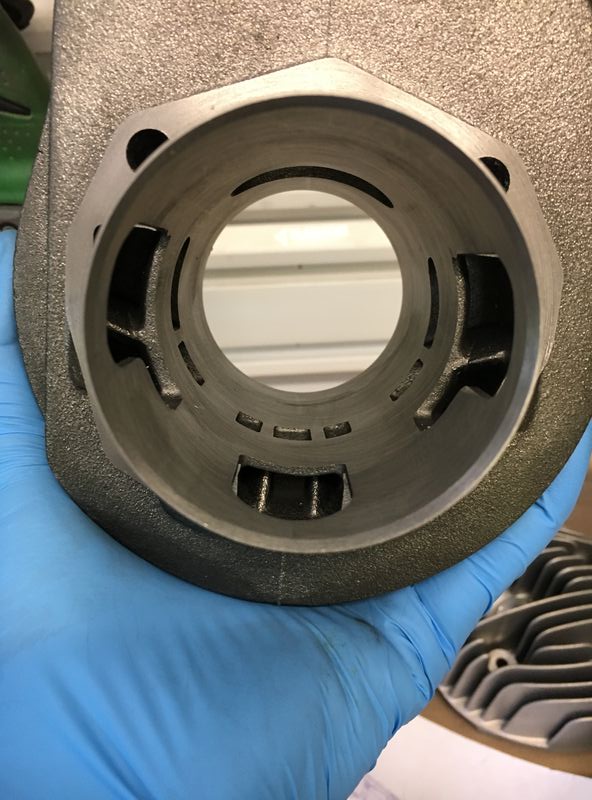
Tracing is just a map - used calipers on actual cyl to measure - see next.
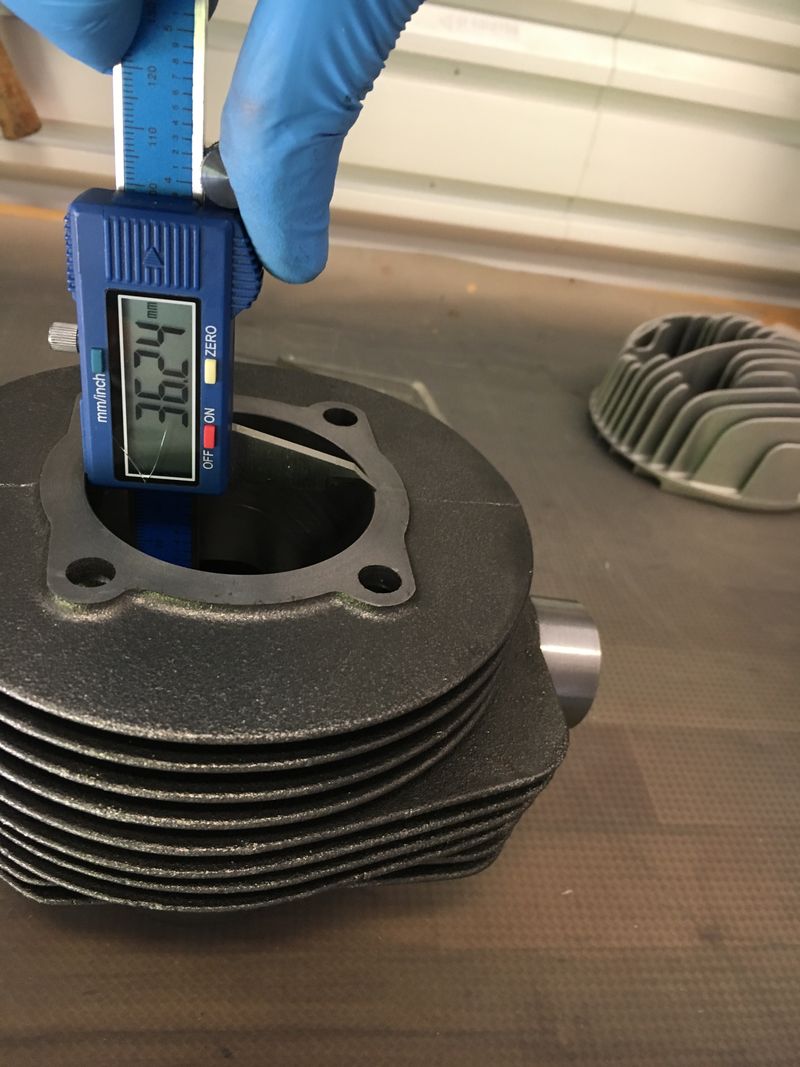
Took measures about 1-2mm deep - used Ginch special tool calipers to measure.
Top down center
Top down center
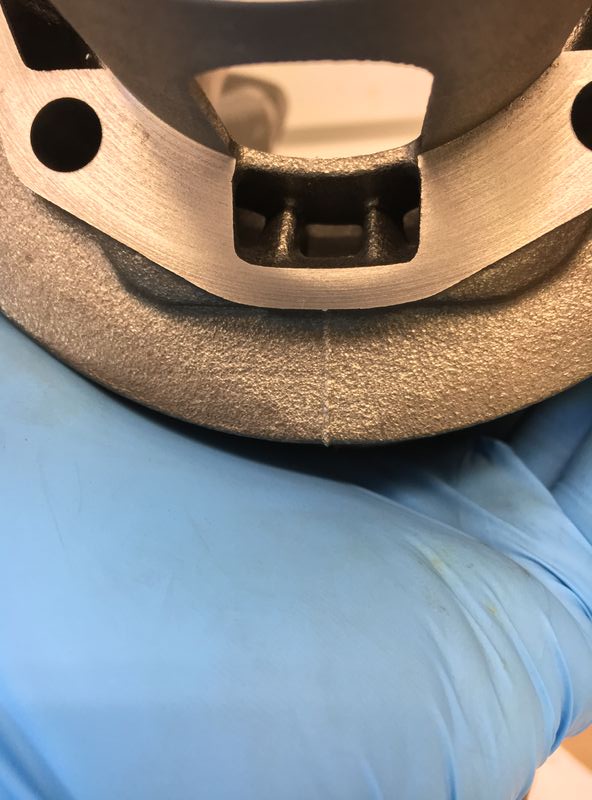
Bottom up - the central inlet port has two webs - kinda porky in thickness says the man with a grinder in his hand
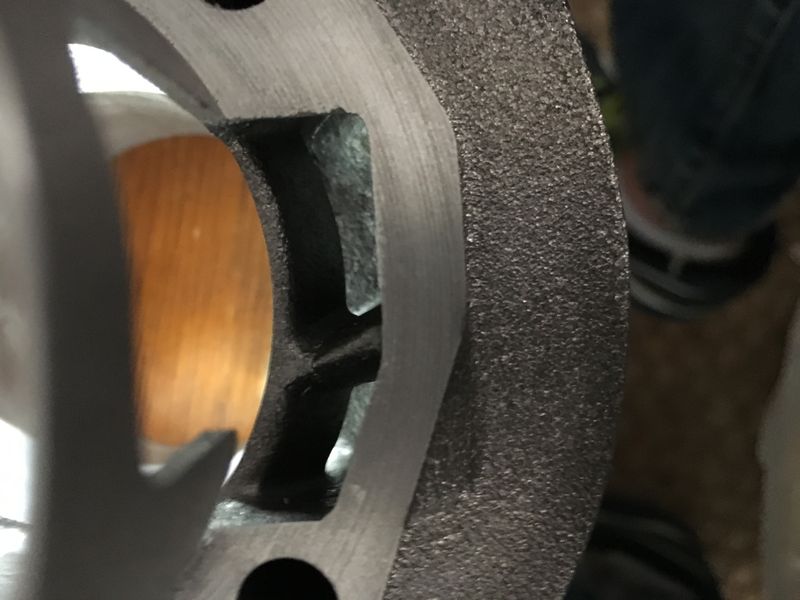
closer view of webbing
transfer port on side
@ginch avatar
UTC

Veni, Vidi, Posti
74 Super, 75 Super, PX project, LML off-roader and '66 Blue Badge Smallframe
Joined: UTC
Posts: 10355
Location: Ballarat VIC, Australia
 
Veni, Vidi, Posti
@ginch avatar
74 Super, 75 Super, PX project, LML off-roader and '66 Blue Badge Smallframe
Joined: UTC
Posts: 10355
Location: Ballarat VIC, Australia
UTC quote
charlieman22 wrote:
Bottom up - the central inlet port has two webs - kinda porky in thickness says the man with a grinder in his hand
Don't be tempted to take too much off there, keep them rounded. Much more efficient in terms of flow than putting a sharp edge on them oddly enough.
OP
@charlieman22 avatar
UTC

Nedminder
62 VBB1T Round Tail W/ leaner sidecar
Joined: UTC
Posts: 4927
Location: california
 
Nedminder
@charlieman22 avatar
62 VBB1T Round Tail W/ leaner sidecar
Joined: UTC
Posts: 4927
Location: california
UTC quote
Quote:
Don't be tempted to take too much off there, keep them rounded. Much more efficient in terms of flow than putting a sharp edge on them oddly enough.
Timely - insightful if counterintuitive too. Thanks.
Curious - what's the book on polishing the insides of any of the ports?
Bang for buck better with some then others? Worth it at all vs just plug and play in your view?
@socalguy avatar
UTC

bodgemaster
63 GL, 76 Super (x2), 74 Primavera (x2), 79 P200, 06 Fly 150
Joined: UTC
Posts: 7962
Location: So Cal
 
bodgemaster
@socalguy avatar
63 GL, 76 Super (x2), 74 Primavera (x2), 79 P200, 06 Fly 150
Joined: UTC
Posts: 7962
Location: So Cal
UTC quote
Quote:
Curious - what's the book on polishing the insides of any of the ports?
Bang for buck better with some then others? Worth it at all vs just plug and play in your view?
Exhaust port can be polished, transfers need surface texture.
OP
@charlieman22 avatar
UTC

Nedminder
62 VBB1T Round Tail W/ leaner sidecar
Joined: UTC
Posts: 4927
Location: california
 
Nedminder
@charlieman22 avatar
62 VBB1T Round Tail W/ leaner sidecar
Joined: UTC
Posts: 4927
Location: california
UTC quote
Quote:
Exhaust port can be polished, transfers need surface texture.
a. one of those good little details to know!
b. thank god - would take forever to try and polish the others!

@ginch avatar
UTC

Veni, Vidi, Posti
74 Super, 75 Super, PX project, LML off-roader and '66 Blue Badge Smallframe
Joined: UTC
Posts: 10355
Location: Ballarat VIC, Australia
 
Veni, Vidi, Posti
@ginch avatar
74 Super, 75 Super, PX project, LML off-roader and '66 Blue Badge Smallframe
Joined: UTC
Posts: 10355
Location: Ballarat VIC, Australia
UTC quote
The polishing is to help carbon sticking to the surface quite so readily, the texture helps to create a boundary layer.
UTC

Jet Eye Master
PX221 MHR heavily tuned, PX200 O tuned, PX181 M1XL tuned, PX166 tuned a quite bit and some motorbikes
Joined: UTC
Posts: 5465
Location: London UK
 
Jet Eye Master
PX221 MHR heavily tuned, PX200 O tuned, PX181 M1XL tuned, PX166 tuned a quite bit and some motorbikes
Joined: UTC
Posts: 5465
Location: London UK
UTC quote
How wide is the exhaust port? If you just measure the paper that will do.

What kind of rings on the piston? 1mm, steel and bendy? The quality of the piston will be similar to the cylinder. All the edges will be sharp and oil scrapingly bad. All windows and skirt to be chamfered inside and out. Make sure they line up with the cylinder first, which will require a dry fit to mark where the piston sits.

When you get your head off, measure the exact stroke. We can assume this is 57.00mm (it won't be but ok for now).

At BDC it is best if the piston and port line up or the port is (only very) slightly lower.

So, assuming all is exact and bolted on zero deck (flush at TDC ) you will have
105/164/29.5
Not bad, if you're upgrading from a 125, weigh 130lb and no side car. Will be all rpm and less (or no more) torque than the 150.

The easiest thing to do is fit a 1.0mm packer. This will will be just about be ok and you'll be able to grind the exhaust and skim the head to get 1.00mm squish.

That head won't easily drop inside the bore, as that would normally be the medium option. To get the head machined and pack up 2.00mm.

Next machining option is to take 3.00mm off the top of the cylinder (top fin gone). This gives a lot of flexibility, the most torque and maximum tinkering ability.

The premier option is to re phase the transfers in the cylinder but that's a specialist job and I think, not worth the effort for a Polini iron cylinder Razz emoticon
OP
@charlieman22 avatar
UTC

Nedminder
62 VBB1T Round Tail W/ leaner sidecar
Joined: UTC
Posts: 4927
Location: california
 
Nedminder
@charlieman22 avatar
62 VBB1T Round Tail W/ leaner sidecar
Joined: UTC
Posts: 4927
Location: california
UTC quote
Jack - good stuff!
At least the half I understood.
Dancing as fast as I can.

Answer: Exhaust port width - 43mm

Piston:
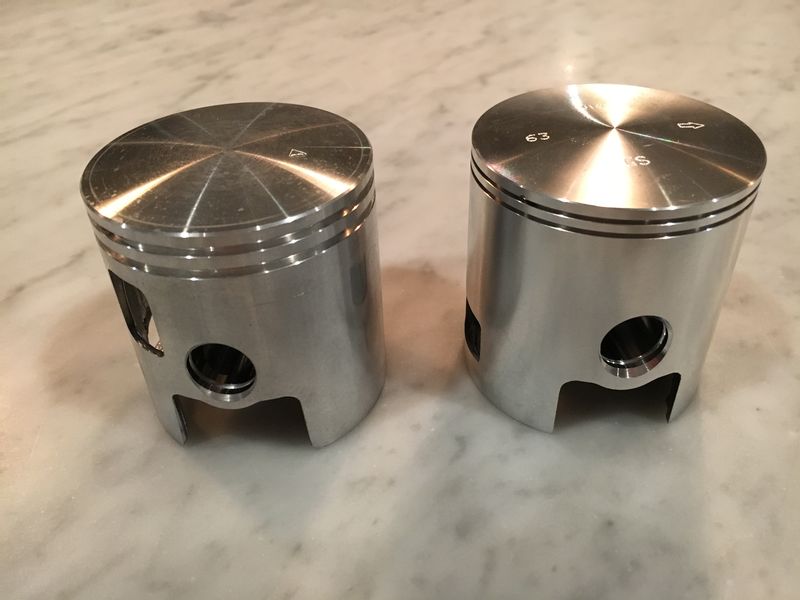
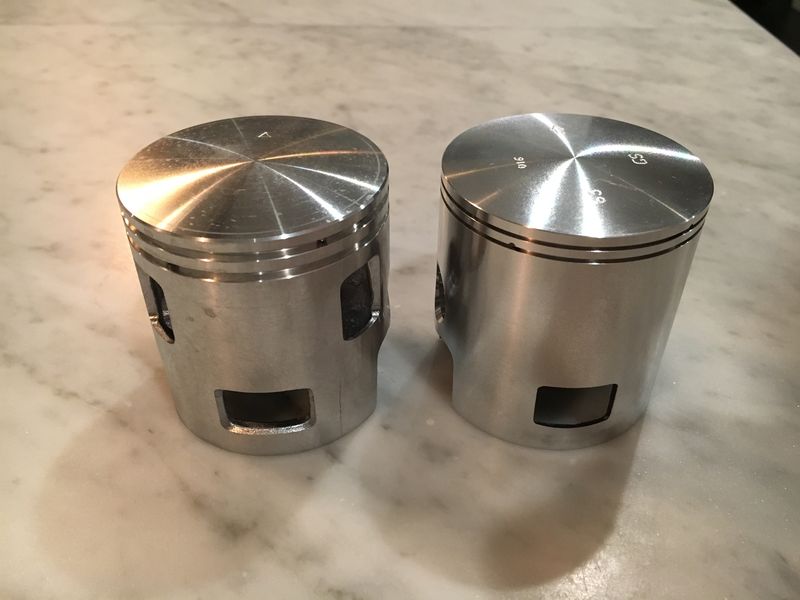
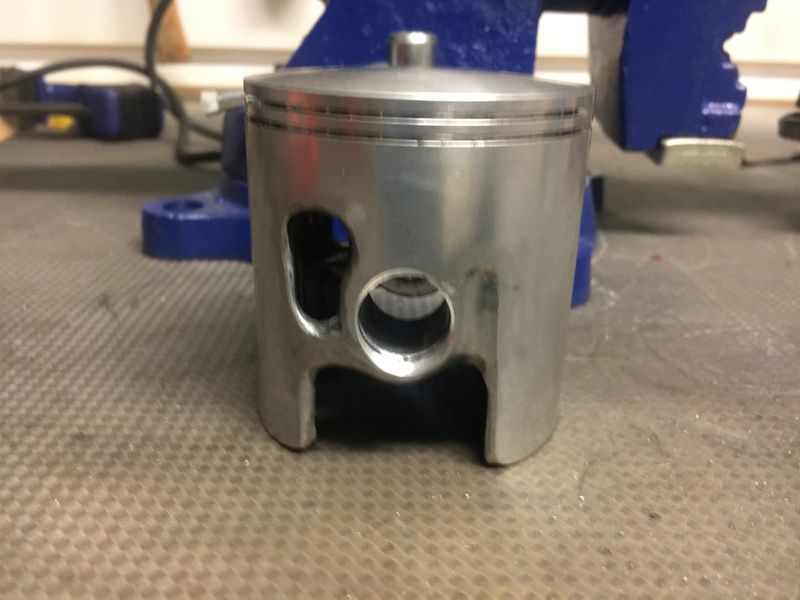
- I have two options. The polini and the GS. See pics.
- GS has the spring metal thin rings - Polini the thick cast ones.

Comparison:
- The Polini has all the edges dressed as you note.
- The GS is sharp enough to cut paper - everywhere.
- The Polini has windows cut in it similar to "O tuned" piston - though not quite full on FMP rooftop-tile-pattern-from-St Stephen's-Vienna-cathedral he shows in his videos.
- The GS lacks the windows entirely - but is thicker walled.
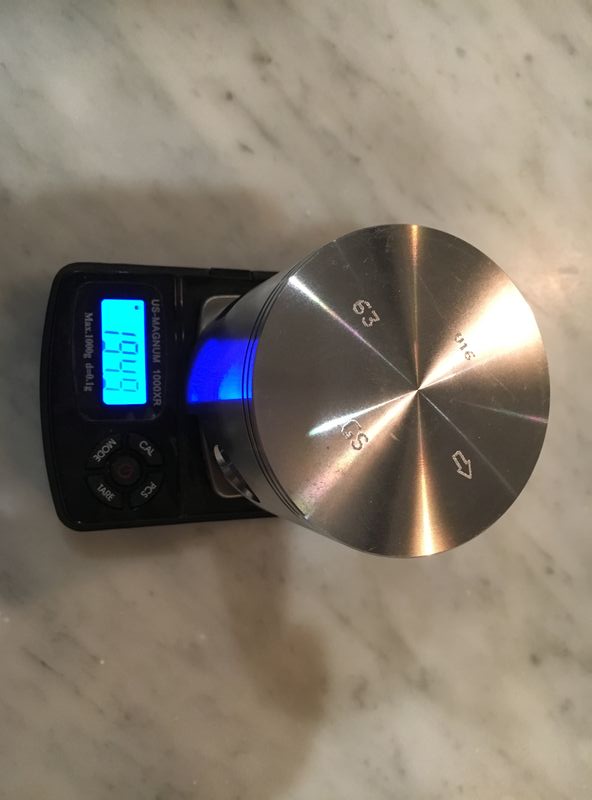
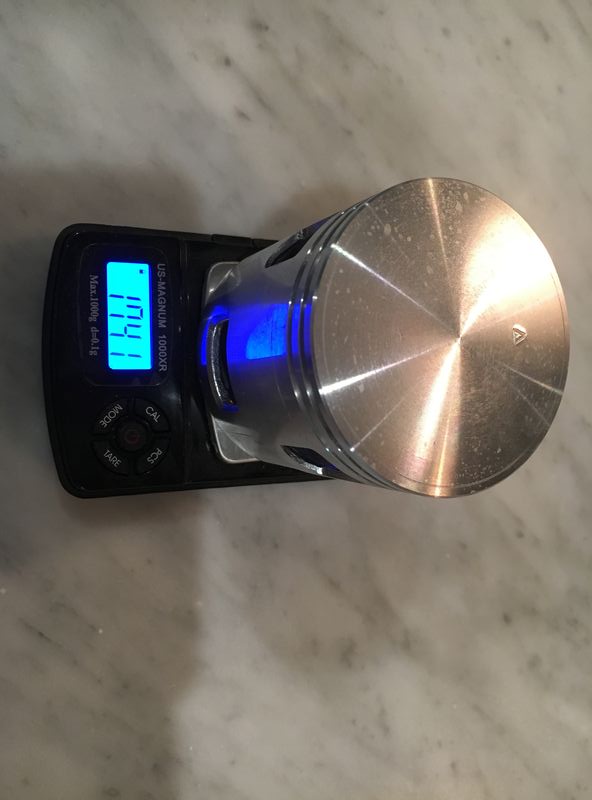
- GS is about 20 grams heavier (solid - but heavy piston's aren't exactly the gold standard?)

Questions/comments:
- What's up with no holes on the GS piston?
- "Make sure they line up with the cylinder first, which will require a dry fit to mark where the piston sits. " Can this be done on bench with just sliding piston in to cyl and aligning exhaust port center with arrow or has to be full assembly?
- "At BDC it is best if the piston and port line up or the port is (only very) slightly lower. " Got it - good insight - like a James May key wine fact. Can work to this.
- "...you will have 105/164/29.5 " ok - this falls in the "half the stuff I didn't understand" pile. Obviously timing numbers but:
1. Can you give me brief low down on what these are and how you get to them? (ik, ik, but its new to me and some of this stuff is a total f*cking mystery).
2. In perfect world - what would optimal set of numbers be?

- "machining option is to take 3.00mm off the top of the cylinder (top fin gone). This gives a lot of flexibility, the most torque and maximum tinkering ability. " Like where you are going with this:
If I follow - This would allow us to lift all transfers with thicker packer (assuming 57mm is actual) but keep squish around 1mm. Normally you would wanna keep transfers low - but with 57mm crank - I won't be opening transfers all the way at BDC. So lift cyl to open existing transfers fully - cut top of cyl to gain back squish target. Total heights are still reasonable?

First pass on execution: I could use packers and bolt cyl on - adding packer thickness until piston resides just above bottom of ports. Then put head on and check squish. Delta from actual squish and 1mm target will be how much we shave off cyl.

Let's make this thing grunt a lil.
Sid view - GS is shinier.  Shapes are pretty well identical
Sid view - GS is shinier. Shapes are pretty well identical
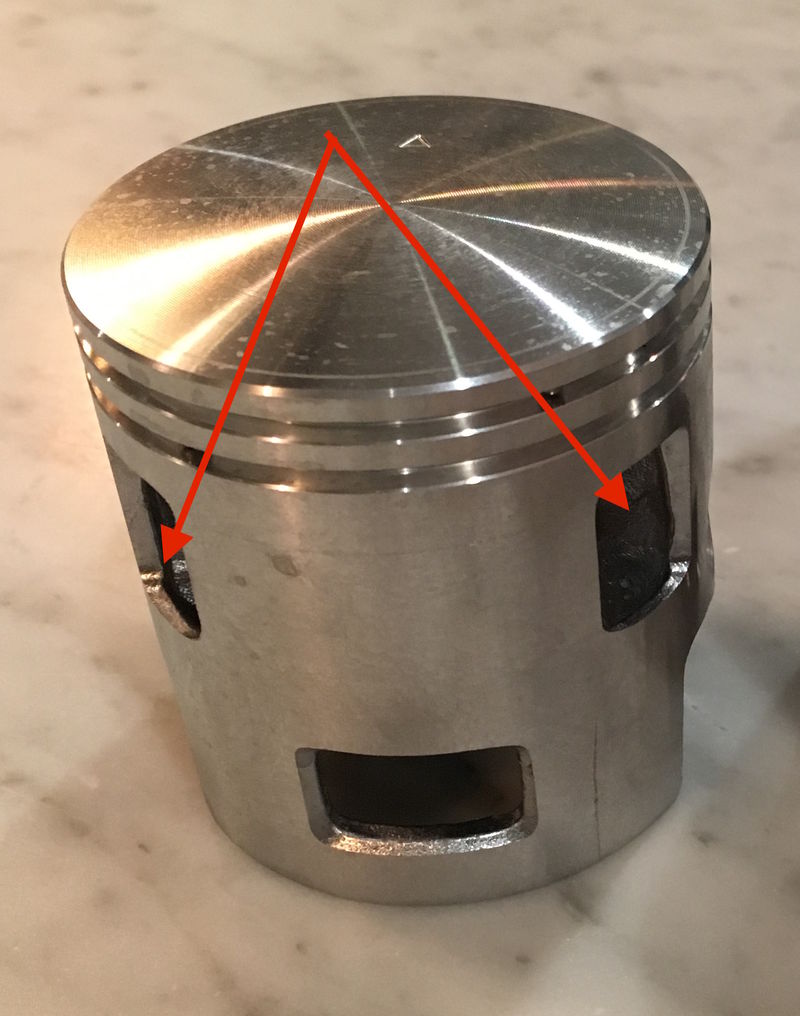
GS on right - lacks the two holes a'la O tuned piston and edges on existing hole are sharp.  Almost like they expect you to cut more holes.
GS on right - lacks the two holes a'la O tuned piston and edges on existing hole are sharp. Almost like they expect you to cut more holes.
Forum member supplied image with no explanatory text
OP
@charlieman22 avatar
UTC

Nedminder
62 VBB1T Round Tail W/ leaner sidecar
Joined: UTC
Posts: 4927
Location: california
 
Nedminder
@charlieman22 avatar
62 VBB1T Round Tail W/ leaner sidecar
Joined: UTC
Posts: 4927
Location: california
UTC quote
All,

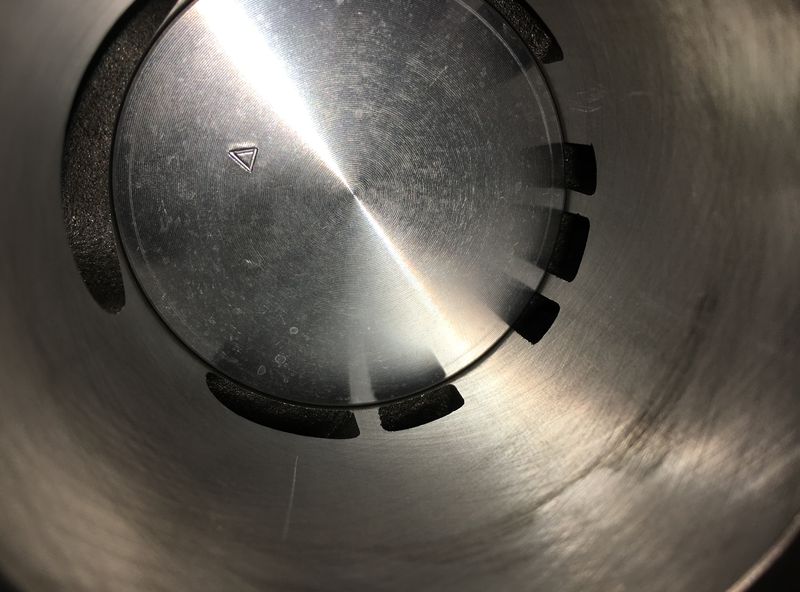
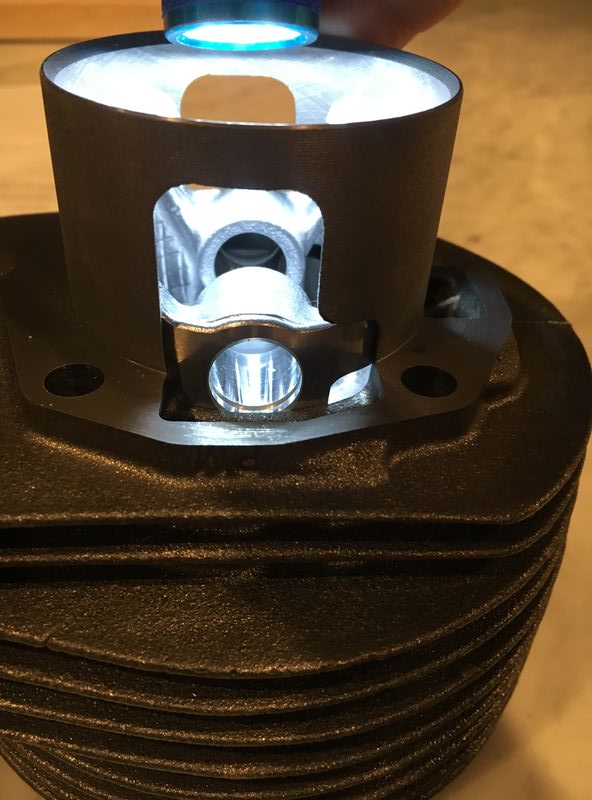
This is the Polini piston in situ showing how the extra two holes align with cyl.
Kinda interesting.

Keep in mind - I only half understand the system.
Sucks gas fuel mixture in.
Pumps it out the exaust.
Sucks fuel air mix through transfer ports
Back pressure has some effect.
(thanks SoCal for hand hold on that one).

How the holes in the side of the piston and cut outs on skirt - come into play - I haven't a clue - but I know O tuning does some kinda Picaso level carvings all over the piston and there must be a reason.

Time to find out.

Set of pictures below shows how holes in side of piston align with various transfer ports at "virtual TDC" which is what I am calling it when piston is flush with cyl. deck. Also shows it about 30MM down in cyl, and all the way down - where piston skirt is aligned with bottom of cyl.

I would be inclined to cut same holes in GS piston having now seen this - tho frankly - really no idea why or what I would be gaining or losing.

Thoughts?
Top of piston is flush with bottom of transfer ports when piston skirt is flush with bottom of cylinder.  This is close to our target at BDC.
Top of piston is flush with bottom of transfer ports when piston skirt is flush with bottom of cylinder. This is close to our target at BDC.
Next set of pics shows how these holes align with cyl ports
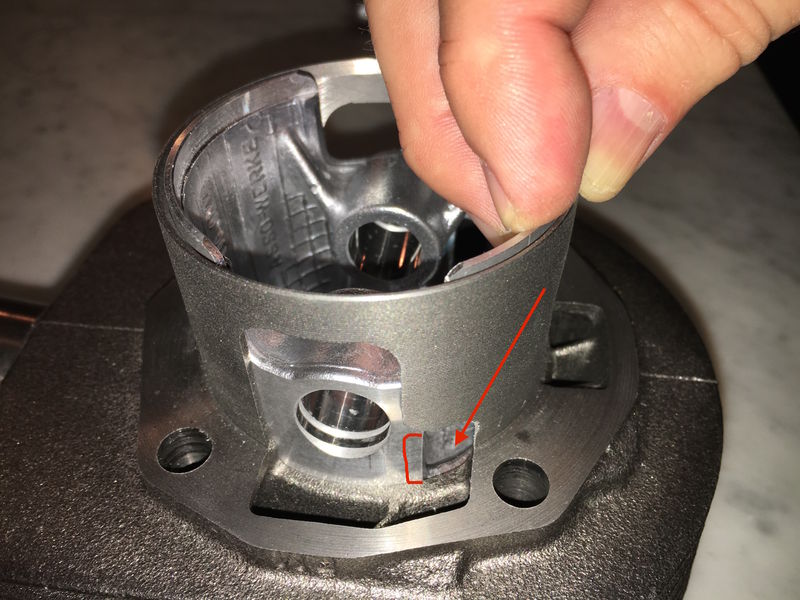
When piston skirt is flush with bottom of cyl, these holes appear to align with L portion of cut out on cyl.  If I add these holes to GS - do I wanna make em bigger?
When piston skirt is flush with bottom of cyl, these holes appear to align with L portion of cut out on cyl. If I add these holes to GS - do I wanna make em bigger?
With piston about 1/3 the way down from "virtual TDC", these holes in the side of piston align with transfer ports in cyl (is there advantage to widen transfers here where red ] is?)
At "vritual" TDC (piston flush with current cyl deck)  side skirt cut out aligns with transfer ports - as does hole near skirt (see next pic)
At "vritual" TDC (piston flush with current cyl deck) side skirt cut out aligns with transfer ports - as does hole near skirt (see next pic)
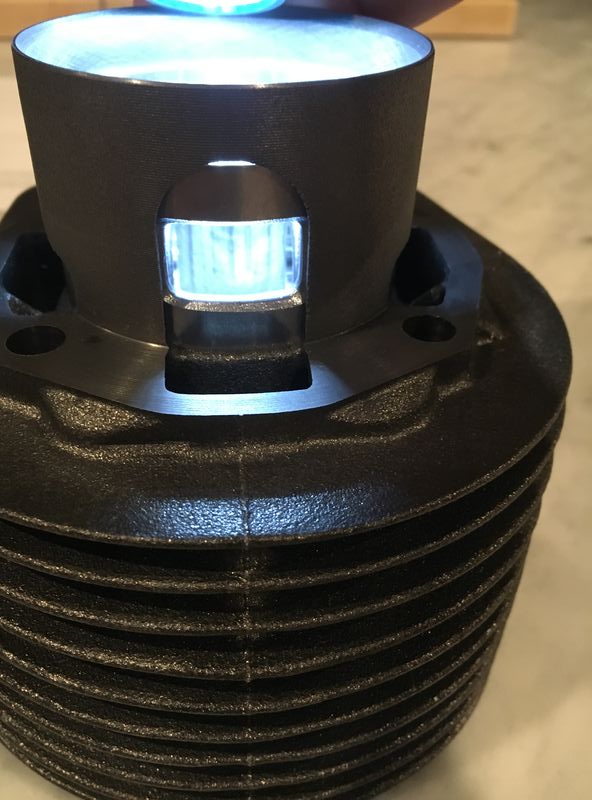
Tough to photograph - but hole in skirt now aligns with transfer port that is across from exhaust port
UTC

Jet Eye Master
PX221 MHR heavily tuned, PX200 O tuned, PX181 M1XL tuned, PX166 tuned a quite bit and some motorbikes
Joined: UTC
Posts: 5465
Location: London UK
 
Jet Eye Master
PX221 MHR heavily tuned, PX200 O tuned, PX181 M1XL tuned, PX166 tuned a quite bit and some motorbikes
Joined: UTC
Posts: 5465
Location: London UK
UTC quote
The arrow on the piston points at the exhaust port but only in the general direction of the exhaust port. The only way to confirm piston orientation is to dry fit it and draw a line on the piston and bore.

BDC port line up is of no concern compared to the time (degrees) when the ports open and high pressure mixture starts squirting out. Like opening the gate on a small corral full of stallions, by the time the gate is near full open they all went already, nobody cares how far you open it once the corral is empty. This does however make a difference on reeds and the horse analogy gets real dumb.
If you set the piston with the transfers just about to open, somewhere about 120 degrees down. This is where all the skirt windows should be full open. Some will need moving. Things will need grinding on the piston and the cylinder.

Polini piston nice, light, smooth..... but crap rings. GS piston it is. Nice proper rings, which is why they are so good. Once the windows are cut it will get lighter. These are sort of a blank piston that fit many kits, so you're right they are not finished.

If you want to deck the cylinder 3mm do it now. If they mess it up there is no work gone into it.
@socalguy avatar
UTC

bodgemaster
63 GL, 76 Super (x2), 74 Primavera (x2), 79 P200, 06 Fly 150
Joined: UTC
Posts: 7962
Location: So Cal
 
bodgemaster
@socalguy avatar
63 GL, 76 Super (x2), 74 Primavera (x2), 79 P200, 06 Fly 150
Joined: UTC
Posts: 7962
Location: So Cal
UTC quote
My dos pesos ...

Piston: Rings on the GS are far superior to the Polini. GS has a higher silicon content and runs much cooler in my scoot. The weight doesn't seem to be a factor. Try weighing them with the wrist pins. I did not cut a window in mine but did chamfer the edges.

Cylinder: I wouldn't mess with it until you get your old one off and do a dry fit and take actual measurements.
@swiss1939 avatar
UTC

Ossessionato
P208, Stella VMC Stelvio 187, Stella 150, VNX1T, V9A1T, V9B1T, 02 Sportster XLH1208
Joined: UTC
Posts: 4110
Location: Staten Island, NY
 
Ossessionato
@swiss1939 avatar
P208, Stella VMC Stelvio 187, Stella 150, VNX1T, V9A1T, V9B1T, 02 Sportster XLH1208
Joined: UTC
Posts: 4110
Location: Staten Island, NY
UTC quote
Looking forward to this. just don't get impatient like I did!
@pheasant_plucker avatar
UTC

Molto Verboso
bare metal cafe racer
Joined: UTC
Posts: 1379
Location: Aotearoa (New Zealand)
 
Molto Verboso
@pheasant_plucker avatar
bare metal cafe racer
Joined: UTC
Posts: 1379
Location: Aotearoa (New Zealand)
UTC quote
Yeah I'm watching with bated breath!
OP
@charlieman22 avatar
UTC

Nedminder
62 VBB1T Round Tail W/ leaner sidecar
Joined: UTC
Posts: 4927
Location: california
 
Nedminder
@charlieman22 avatar
62 VBB1T Round Tail W/ leaner sidecar
Joined: UTC
Posts: 4927
Location: california
UTC quote
Jack - good stuff.
What inputs did you use to get 105/164/29.5 (did you assume 0 for piston to deck?)

Took me some time to digest - but I'm getting there.
Feel free to skip over my learnings for those of you who know all this already.

There are two things we are trying to optimize.
1. Port timings
2. Flow

They are related - but let's park port timings for a moment.
I wanna talk about optimizing flow - maximizing combustion charge.

Was puzzled by the extra holes in Polini piston.
First inclination was just to punch same Polini holes in GS piston.
After all - they have been placed there for a reason and just matching should be fine right?

Well - that depends. If your cases are ported (mine aren't) to match the cylinder - then yes. But if not, then the holes are basically blanked off without access to the pressurized gas/air as the piston comes down towards BDC. Instead - the gas/air has to find another route.

SoCal set his up without porting the case - and without cutting holes in the piston - realizing they would get very limited feed anyway without the ported cases. Turns out it works fine - must just pump the gas air through normal side and front channels.

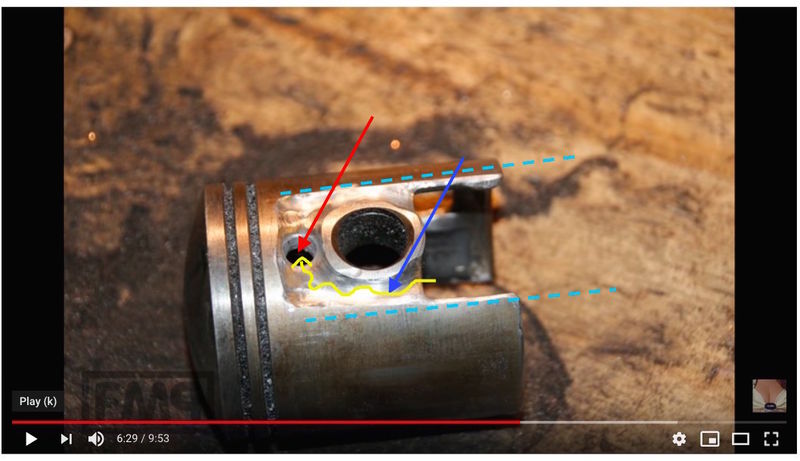
I am curious about how much extra oomph might be there - but don't plan to port cases. Went back and watched O tune vid of FMP - and realized that is basically what these new cylinders do - only with wider ports rather than carved channels in the piston. Polini's holes are forward because that aligns them with the wider side channel. O tune added hole is above the piston pin because it is aligned with existing stock side port of normal width.

(Kinda makes me wanna do some quick O tune work on my existing cylinder and piston to see how it goes...)

Considering options for some channels and holes on my GS piston that would allow the front ports to get fed as if I had ported cases - more ways then one to skin a cat...

See below:
O tune - yellow (gas) flows up blue (channel) and feeds red (hole).  As opening in piston skirts below pin are closing off - hole above skirts continues to feed
O tune - yellow (gas) flows up blue (channel) and feeds red (hole). As opening in piston skirts below pin are closing off - hole above skirts continues to feed
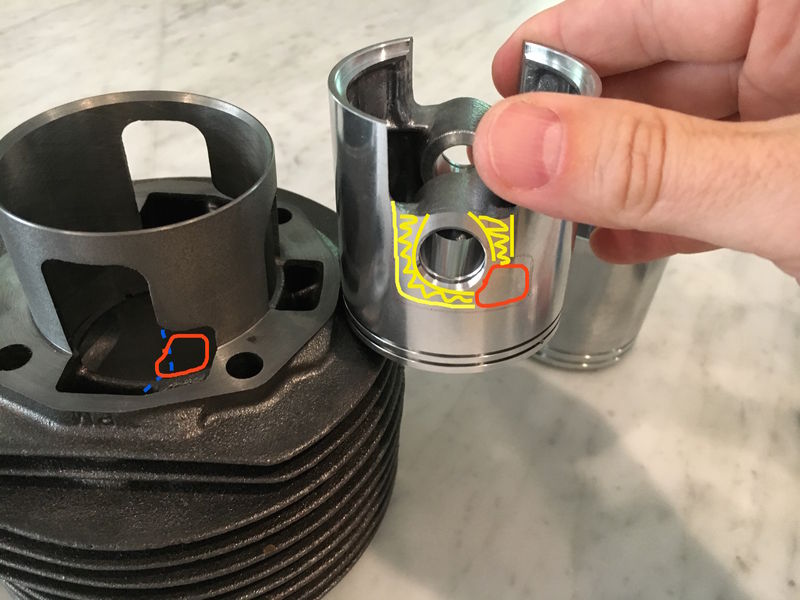
Hole in polini piston aligns with widened port - but this widened area is mostly blanked off if cases not ported.
Yellow would be channel - red would be hole.  This is the GS piston - one concept for feeding the hole without porting the cases
Yellow would be channel - red would be hole. This is the GS piston - one concept for feeding the hole without porting the cases
OP
@charlieman22 avatar
UTC

Nedminder
62 VBB1T Round Tail W/ leaner sidecar
Joined: UTC
Posts: 4927
Location: california
 
Nedminder
@charlieman22 avatar
62 VBB1T Round Tail W/ leaner sidecar
Joined: UTC
Posts: 4927
Location: california
UTC quote
Quote:
BDC port line up is of no concern compared to the time (degrees) when the ports open and high pressure mixture starts squirting out. Like opening the gate on a small corral full of stallions, by the time the gate is near full open they all went already, nobody cares how far you open it once the corral is empty. This does however make a difference on reeds and the horse analogy gets real dumb.
Ha - got it. Fuel air is under pressure as piston comes down - wants to escape. Timing is critical.
Quote:
If you set the piston with the transfers just about to open, somewhere about 120 degrees down. This is where all the skirt windows should be full open. Some will need moving. Things will need grinding on the piston and the cylinder.
See pics below. Assuming I achieve 120 by lifting cylinder - then piston will be positioned as seen in these pics. Seems like this is as open as they could get?
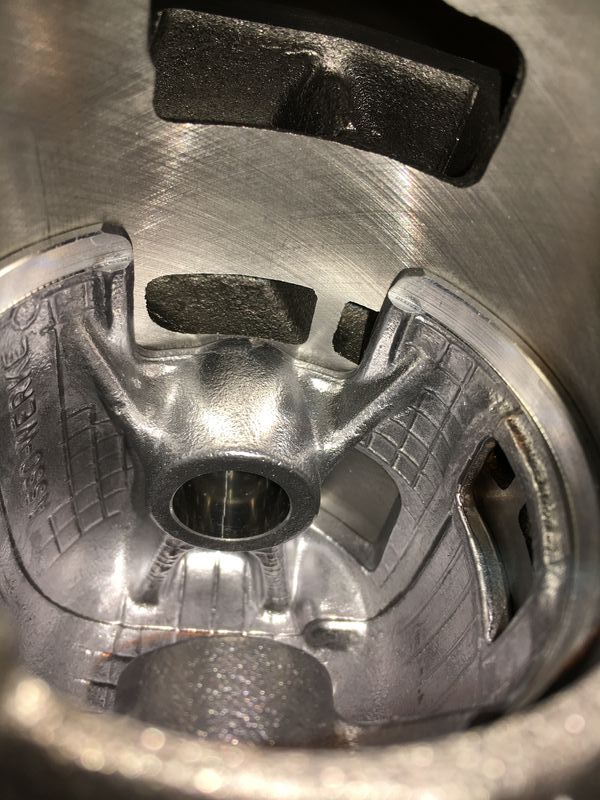
Piston is at roughly 120 here - just above top of transfer ports in cylinder.  side skirt wide open and auxiliary "polini" hole also started to open
Piston is at roughly 120 here - just above top of transfer ports in cylinder. side skirt wide open and auxiliary "polini" hole also started to open
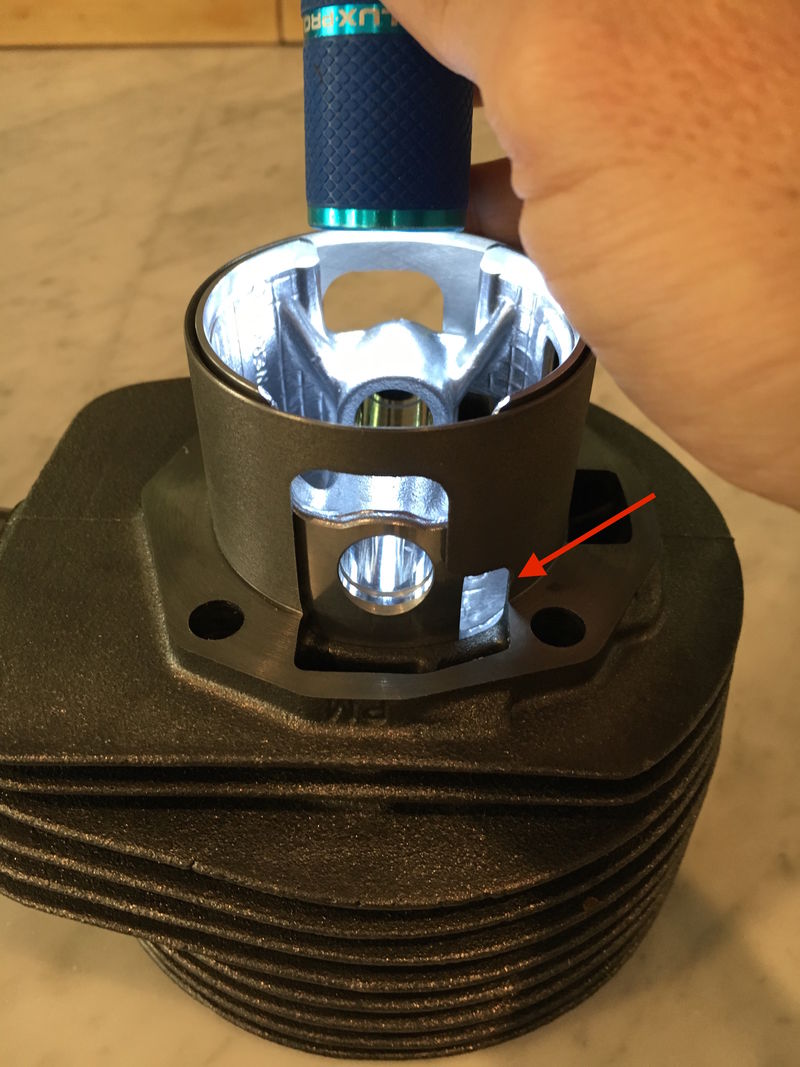
Front port with piston at same theoretical 120 position.  Does one open up this hole taller in either direction or is it better to keep as is.
Front port with piston at same theoretical 120 position. Does one open up this hole taller in either direction or is it better to keep as is.
UTC

Jet Eye Master
PX221 MHR heavily tuned, PX200 O tuned, PX181 M1XL tuned, PX166 tuned a quite bit and some motorbikes
Joined: UTC
Posts: 5465
Location: London UK
 
Jet Eye Master
PX221 MHR heavily tuned, PX200 O tuned, PX181 M1XL tuned, PX166 tuned a quite bit and some motorbikes
Joined: UTC
Posts: 5465
Location: London UK
UTC quote
Between countries again here. In a bar so I'll be brief.
The ports you cut in the GS piston can. Be longer and thinner. From socalguy we know these don't matter so much but more is more, so we're interested.
On the right track but careful not to confuse the essential with fine tuning.
OP
@charlieman22 avatar
UTC

Nedminder
62 VBB1T Round Tail W/ leaner sidecar
Joined: UTC
Posts: 4927
Location: california
 
Nedminder
@charlieman22 avatar
62 VBB1T Round Tail W/ leaner sidecar
Joined: UTC
Posts: 4927
Location: california
UTC quote
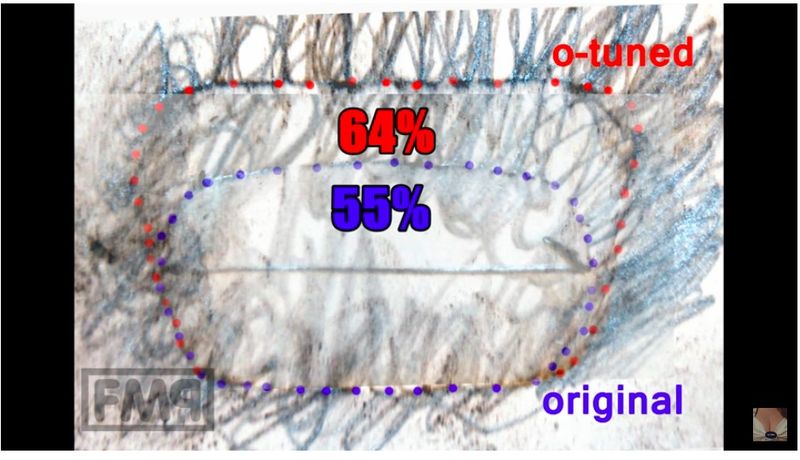
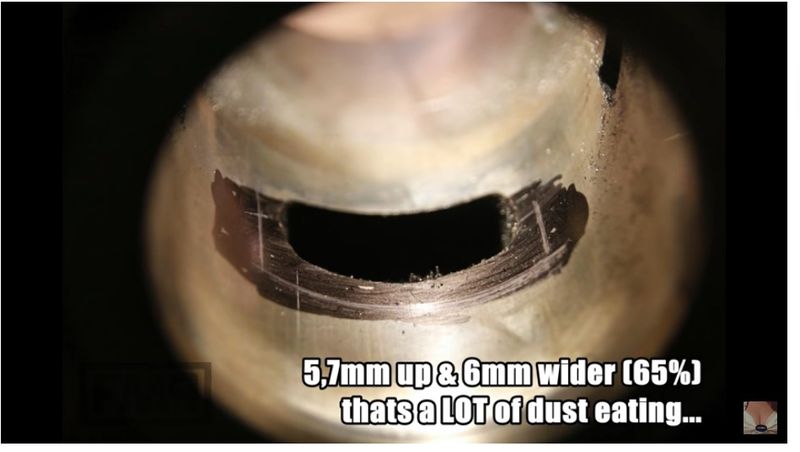
O tuning question
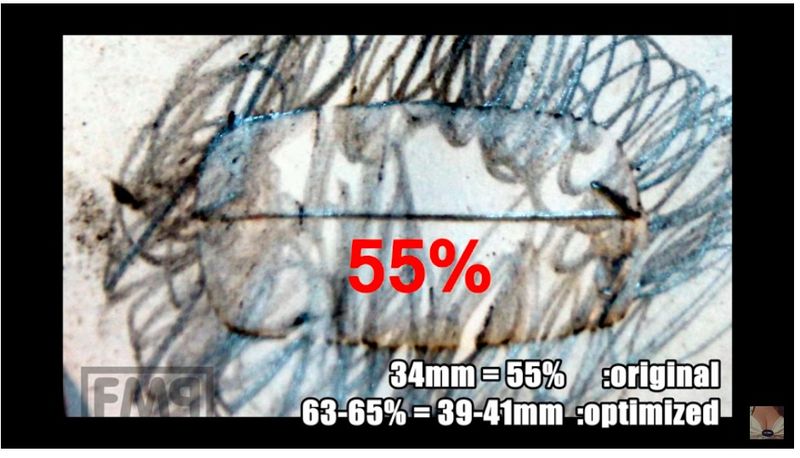
One calculation I have not been able to decipher is the exhaust port width.
Below is from FMPs O tune of a 150.

In some videos he seems to target 60%
In others its 65%

If I could figure out 65% of what exactly - I might also ask why the different targets. Perhaps different motors.

Can anyone enlighten me on what the percentage is of/how this is calculated/ what a 150 vs a 177 target would be?

Thanks!
Forum member supplied image with no explanatory text
I think he has his calc backwards (39 was original timing and 34 was after he ground the port to lift it)
@socalguy avatar
UTC

bodgemaster
63 GL, 76 Super (x2), 74 Primavera (x2), 79 P200, 06 Fly 150
Joined: UTC
Posts: 7962
Location: So Cal
 
bodgemaster
@socalguy avatar
63 GL, 76 Super (x2), 74 Primavera (x2), 79 P200, 06 Fly 150
Joined: UTC
Posts: 7962
Location: So Cal
UTC quote
It's percentage of bore diameter.

Jennings: "A relatively mildly-tuned engine will have an exhaust port width equal to at least 50-percent of its bore diameter ..."
@ginch avatar
UTC

Veni, Vidi, Posti
74 Super, 75 Super, PX project, LML off-roader and '66 Blue Badge Smallframe
Joined: UTC
Posts: 10355
Location: Ballarat VIC, Australia
 
Veni, Vidi, Posti
@ginch avatar
74 Super, 75 Super, PX project, LML off-roader and '66 Blue Badge Smallframe
Joined: UTC
Posts: 10355
Location: Ballarat VIC, Australia
UTC quote
IMPORTANT! (ask me how I know!)

As Mike says it's a percentage of bore diameter, but measured at the circumference, not as a straight line across the port. It makes the difference between more power and the rings falling into the port and breaking.

The 65% is seen as the safe maximum width that our rings can handle. I believe this holds for most of the cylinders across the range.
OP
@charlieman22 avatar
UTC

Nedminder
62 VBB1T Round Tail W/ leaner sidecar
Joined: UTC
Posts: 4927
Location: california
 
Nedminder
@charlieman22 avatar
62 VBB1T Round Tail W/ leaner sidecar
Joined: UTC
Posts: 4927
Location: california
UTC quote
IMPORTANT! (ask me how I know!)

Gracious - your timing was good on that.
More on that later...

Now that you mention it - it does seems like you are always encouraging Craig, Huck Finn style, to build stuff that just might blow up his engines (before he rebuilds them as floating zeppelins).

Might there be a story behind an exhaust miss measure of your own?

OP
@charlieman22 avatar
UTC

Nedminder
62 VBB1T Round Tail W/ leaner sidecar
Joined: UTC
Posts: 4927
Location: california
 
Nedminder
@charlieman22 avatar
62 VBB1T Round Tail W/ leaner sidecar
Joined: UTC
Posts: 4927
Location: california
UTC quote
Quote:
IMPORTANT! (ask me how I know!)
Ginch - can you clarify following?

I used the trace method to measure the Pollini - then laid it flat.
Did a pretty careful job - came up with 42.5 mm.
Quick calc using 63MM bore would be 67%.
Looks like these guys have already done the heavy lifting on width.
Does that measure method and calc match how you woulda approached/ solid?

Tks.
UTC

Jet Eye Master
PX221 MHR heavily tuned, PX200 O tuned, PX181 M1XL tuned, PX166 tuned a quite bit and some motorbikes
Joined: UTC
Posts: 5465
Location: London UK
 
Jet Eye Master
PX221 MHR heavily tuned, PX200 O tuned, PX181 M1XL tuned, PX166 tuned a quite bit and some motorbikes
Joined: UTC
Posts: 5465
Location: London UK
UTC quote
Looks like they did squat
This is what I think. The exhaust port is chord width....not arc. Even if you measure the paper while flat its still arc Razz emoticon Not 67% after all. More like 39.34mm, which is 62%

What actually determines the percentage possible is mostly the type of rings. Big fat stock iron ones struggle with over 60%. At 62% the stock Polini rings are pushing it. The good news is, your bendy steel GS ones will go to 70% max. 44.10mm. Dremel at the ready?
OP
@charlieman22 avatar
UTC

Nedminder
62 VBB1T Round Tail W/ leaner sidecar
Joined: UTC
Posts: 4927
Location: california
 
Nedminder
@charlieman22 avatar
62 VBB1T Round Tail W/ leaner sidecar
Joined: UTC
Posts: 4927
Location: california
UTC quote
Some pesky work for my paying job got in the way this week - but had a good run at it yesterday.

Fit and properly measured timings on new Polini, figured I would also O tune existing 150 as practice while I sent cylinder out to be decked.
That ended up a bit of a debacle - but practice was good.
Did allow me to take measure on timings for Polini.

Port timings with .2 base gasket are: 164.5/109/27.29
PBT = .5
Squish =1.25

With .5 PBT (already 1.25 squish) I cant raise the timings with decking very much. I could grind exhaust upwards to lift - and may - but inlets would be a bear and blow down would increase - may not be good for torque. Also - Since I like my torque and have the jolly green giant for a 4th gear - think I will leave timings here and see how it goes. Suspect it will be solid.

Maxing exhaust port width is intriguing - instead of raising timings - gives size but avoids getting peaky. Adds a hair of reliability risk tho... Using Jack's math and actual cord measurement looks like this (jack - I love the double dip on both width percentage increase and cord line measure - you are not fooling around)

Exhaust port as the crow flies (cord) is 39.2. 70% would be 5.3 MM wider using cord measure. That is a lotta width. Using "traditional" means to measure on circumference, 70% would be 44.1mm (I am at 42.5 on circ. measure).

Considering a few mm of widening - hey - its an iron cylinder and I have a spare set of rings - but a bit cautious on that still.

Below - the warm up round as I work on the Polini now.
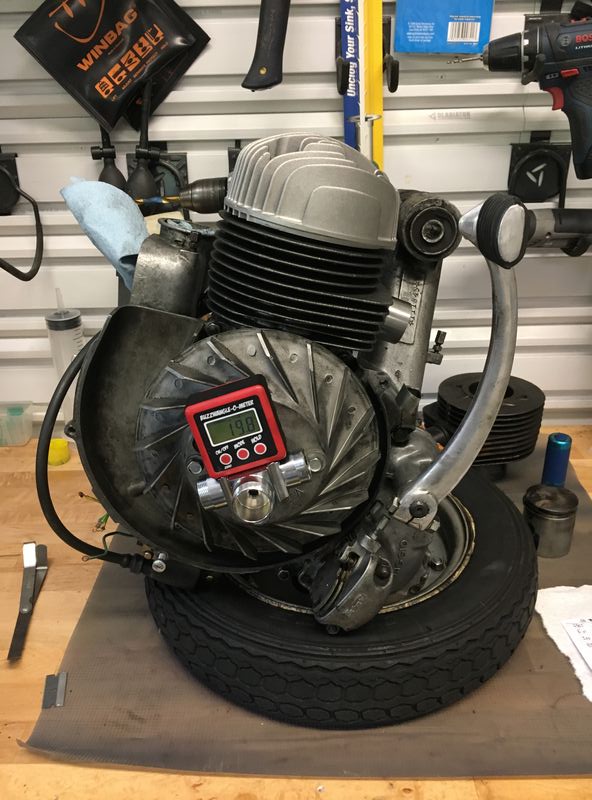
Put motor on engine stand and whipped out my buzwangle.  Like!  Helped me get much more accurate/proficient at using a caliper to measure.
Put motor on engine stand and whipped out my buzwangle. Like! Helped me get much more accurate/proficient at using a caliper to measure.
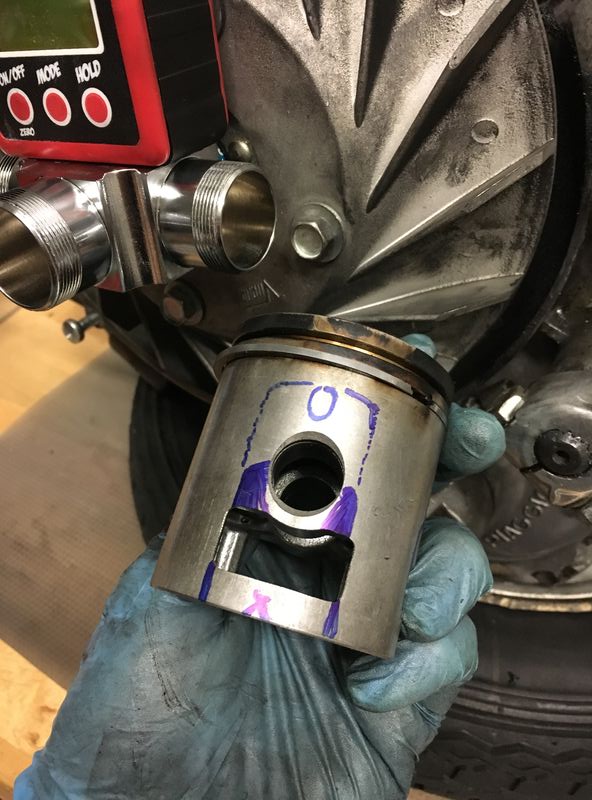
Marked up old piston for some practice
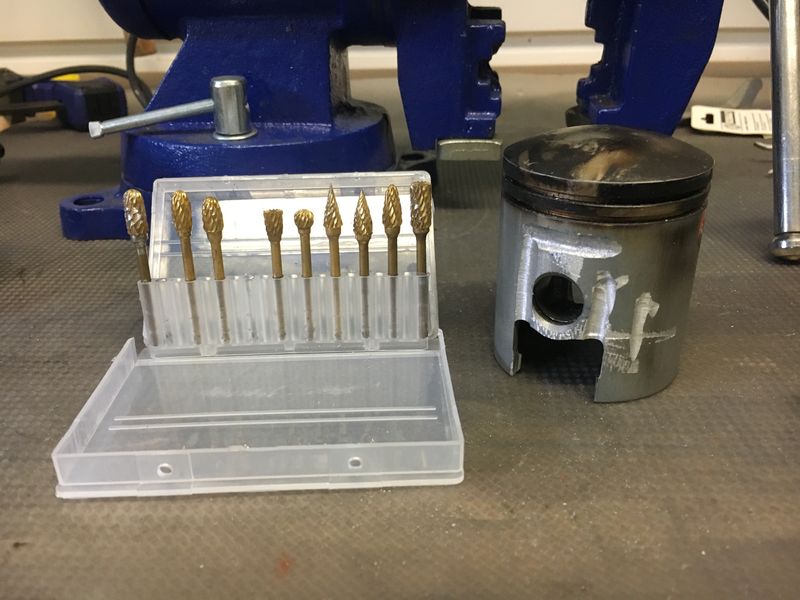
Tested different shaped bits (all over) piston - until I found the ones I liked the most
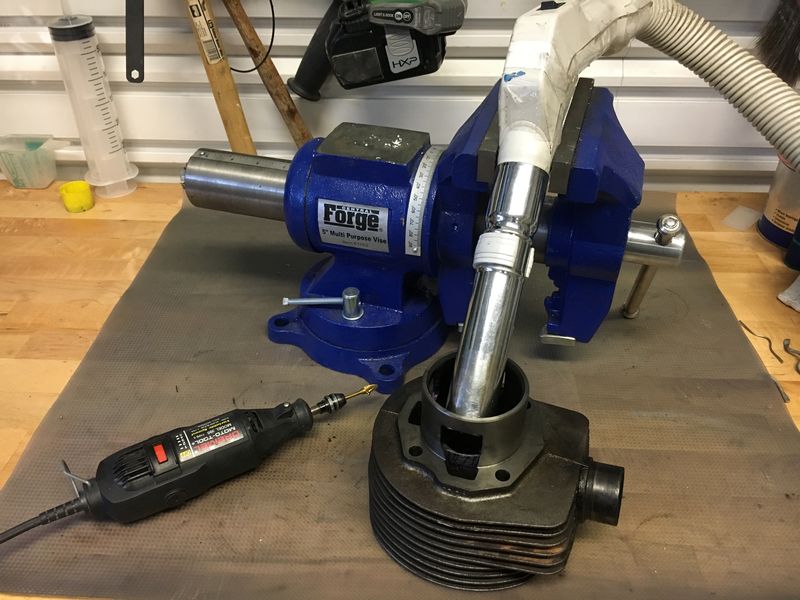
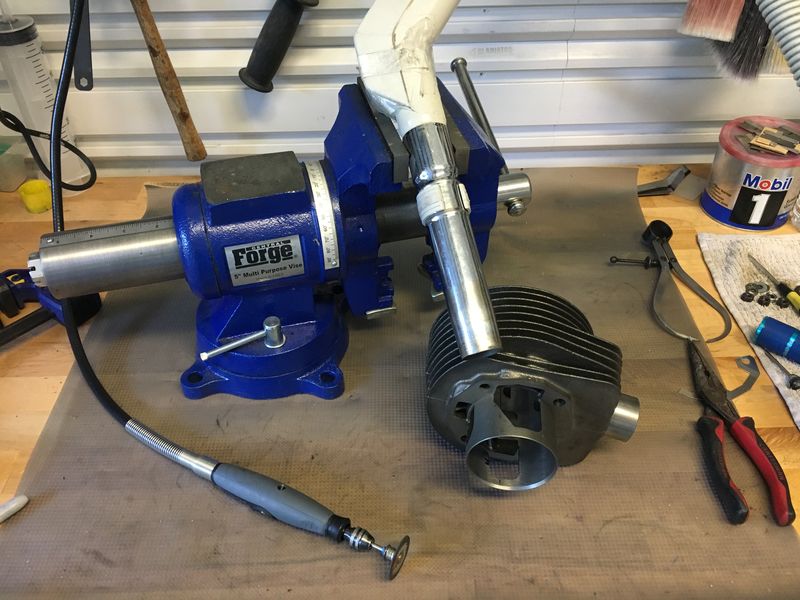
Home made dust collector to match engine stand.
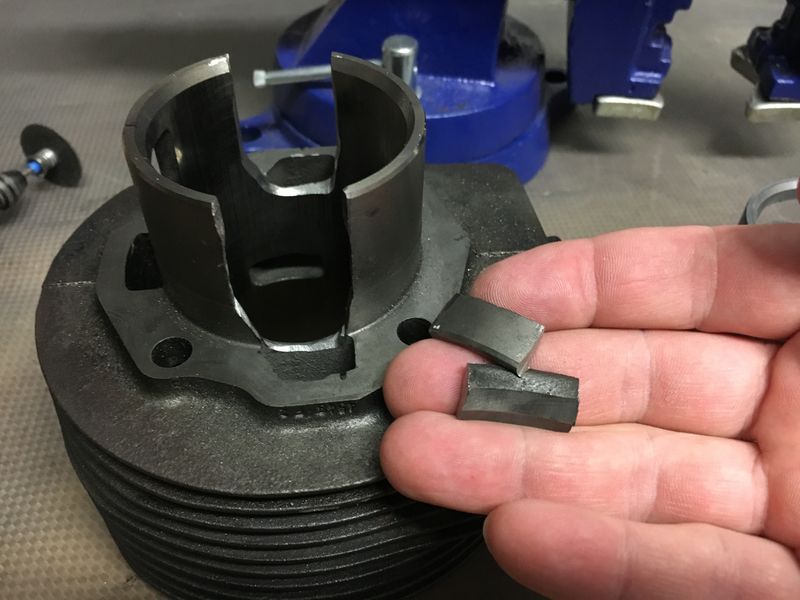
Oops.  Cut the PISTON skirt, not the CYLINDER skirt.  Chuckle - was great practice.  Will get it right on the Polini.  Working on that now.
Oops. Cut the PISTON skirt, not the CYLINDER skirt. Chuckle - was great practice. Will get it right on the Polini. Working on that now.
UTC

Jet Eye Master
PX221 MHR heavily tuned, PX200 O tuned, PX181 M1XL tuned, PX166 tuned a quite bit and some motorbikes
Joined: UTC
Posts: 5465
Location: London UK
 
Jet Eye Master
PX221 MHR heavily tuned, PX200 O tuned, PX181 M1XL tuned, PX166 tuned a quite bit and some motorbikes
Joined: UTC
Posts: 5465
Location: London UK
UTC quote
Not sure where you are going with this but fun to watch.

I don't recommend doing that side channel on the GS piston. Lot of risk for something that will add pretty much nothing.

The wider you get the exhaust port the more torque you will have. 2.5mm each side and no side chamfer will be ok. Not ok means the cylinder will eat piston rings, so no pressure. The ex port top edge shape is ok for what you are doing.

I see you're already into the squish/transfer dilemma. If you're not going to get the cylinder shortened, the head will need a heavy skim. Leaving the transfers at any less than 118 is going to be less good/dull.
OP
@charlieman22 avatar
UTC

Nedminder
62 VBB1T Round Tail W/ leaner sidecar
Joined: UTC
Posts: 4927
Location: california
 
Nedminder
@charlieman22 avatar
62 VBB1T Round Tail W/ leaner sidecar
Joined: UTC
Posts: 4927
Location: california
UTC quote
Jack - thanks for weighing in.

I'll post separately on piston design optimization. Have some thoughts/insights there.
Quote:
2.5mm each side and no side chamfer will be ok. Not ok means the cylinder will eat piston rings, so no pressure.
Ha! Indeed.
Quote:
I see you're already into the squish/transfer dilemma. If you're not going to get the cylinder shortened, the head will need a heavy skim. Leaving the transfers at any less than 118 is going to be less good/dull.
Can't quite process.
Let's use my numbers and the 118 target for an example.
Base to case is as low as it can go and still seal (.2 gasket and some Hondabond/Threebond like sealant).
This puts my timings at:
Ex 164.5 (36.7mm measured)
In 108.97(48.15mm measured)
PBT .5
Squish 1.25

If I take anything off the top of the cyl, to shorten measure - PBT also goes down same amount - leaving timings unchanged.

Online calculators don't take squish in to consideration for calculating timings - so no way to calculate how much skim is needed to hit 118. (only have 1.25 squish in total at my disposal to work with as well)

Can you elaborate on that one - how does one calc affect on timings with head skim? .25 would take my squish down to 1.0mm - no idea what that would do to timings tho
@socalguy avatar
UTC

bodgemaster
63 GL, 76 Super (x2), 74 Primavera (x2), 79 P200, 06 Fly 150
Joined: UTC
Posts: 7962
Location: So Cal
 
bodgemaster
@socalguy avatar
63 GL, 76 Super (x2), 74 Primavera (x2), 79 P200, 06 Fly 150
Joined: UTC
Posts: 7962
Location: So Cal
UTC quote
Some interesting and unexpected plot twists in charlie's build saga, for sure... I have some inside info but not giving away any spoilers. Will let him do a show and tell when he's ready.

I think the transfer timing will be ok. Polini deliberately designed the transfer ports on these grunty cast iron kits with less steep angles so power is made at low and mid rpm. He's not running an expansion pipe.

I don't think 118° is a magic number. The SS90, for example, is a well-designed engine, certainly no slouch by anyone's standard. Transfer time is something like 103°, exhaust time around 144°, which results in an exhaust resonance about 5250 rpm.
UTC

Jet Eye Master
PX221 MHR heavily tuned, PX200 O tuned, PX181 M1XL tuned, PX166 tuned a quite bit and some motorbikes
Joined: UTC
Posts: 5465
Location: London UK
 
Jet Eye Master
PX221 MHR heavily tuned, PX200 O tuned, PX181 M1XL tuned, PX166 tuned a quite bit and some motorbikes
Joined: UTC
Posts: 5465
Location: London UK
UTC quote
The squish has no affect on the timing, which is why it is not in the calculators. To go well it needs to be between 0.5 annd 1.5mm. Tighter the better.

Your cylinder is a long way from 118°. To get there you need 2.20mm of base gasket (2mm packer and a stock Piaggio gasket).

This makes the squish huge. Cut off 3mm from the top of the cylinder and adjust squish back with a head gasket and all of a sudden you have a scooter that is faster than an SS90 Razz emoticon
@socalguy avatar
UTC

bodgemaster
63 GL, 76 Super (x2), 74 Primavera (x2), 79 P200, 06 Fly 150
Joined: UTC
Posts: 7962
Location: So Cal
 
bodgemaster
@socalguy avatar
63 GL, 76 Super (x2), 74 Primavera (x2), 79 P200, 06 Fly 150
Joined: UTC
Posts: 7962
Location: So Cal
UTC quote
I don't know but I'm going to name my next dog Buzzwangle
OP
@charlieman22 avatar
UTC

Nedminder
62 VBB1T Round Tail W/ leaner sidecar
Joined: UTC
Posts: 4927
Location: california
 
Nedminder
@charlieman22 avatar
62 VBB1T Round Tail W/ leaner sidecar
Joined: UTC
Posts: 4927
Location: california
UTC quote
Little work travel and a stripped stud had me sidelined for a few days.
Quote:
Cut off 3mm from the top of the cylinder and adjust squish back with a head gasket
Right - forest through the trees moment for me - appreciated the direction.
I suspect as-is will provide me plenty of grunt.
If I want some sparkle at the top tho - should raise timings to 118/174

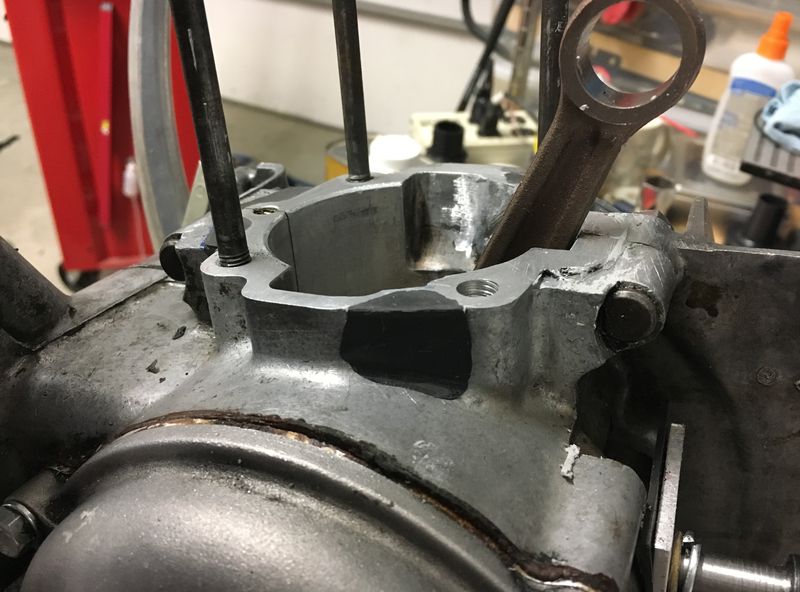
Quick update: turns out my '61 orig cases are not plug and play... Not only did they lack the meat to match ports (I wasn't going to match anyway) they lacked the meat to even sit under the ports - cyl transfer ports completely overhang past outside of case - unusable like this. There was also an area at the back that could benefit from a longer landing pad for the cyl. base.

So out came the JB weld, and I had a go at widening.
At that point, in for a penny... I ported the case.
I kept the depth at less then the full transfer port depth - to give an upward high pressure spray as the piston comes to BDC.

Then it was on to the Piston.
Here I added holes and a small groove in the side.
The groove ends below the hole - so last blast is through the hole.
The idea here was to provide high pressure transfer at the end of the stroke.

All above was based on my own theories of what's going on after I looked at some of the more popular kits - like Quatrini & Mallossi.
The GS piston is kinda old school tank.
It has some structural ribs which I avoided grinding in to for the most part - opting instead to cut areas that represented the "skin" between the ribs to achieve what I was going after.

I could probably do a better job optimizing on a second go - was first run and I was figuring stuff out as I went - but learned a lot just handling it, about how the piston holes are timed and shaped. Suspect it will go pretty well once I assemble.

In any event - there is a clock on this motor before it needs to get split. There is some play in the con rod - I will likely be picking pieces up out of the bottom of the case before it is all over. And when I split cases, one might suspect that a 60MM crank might find it's way in...
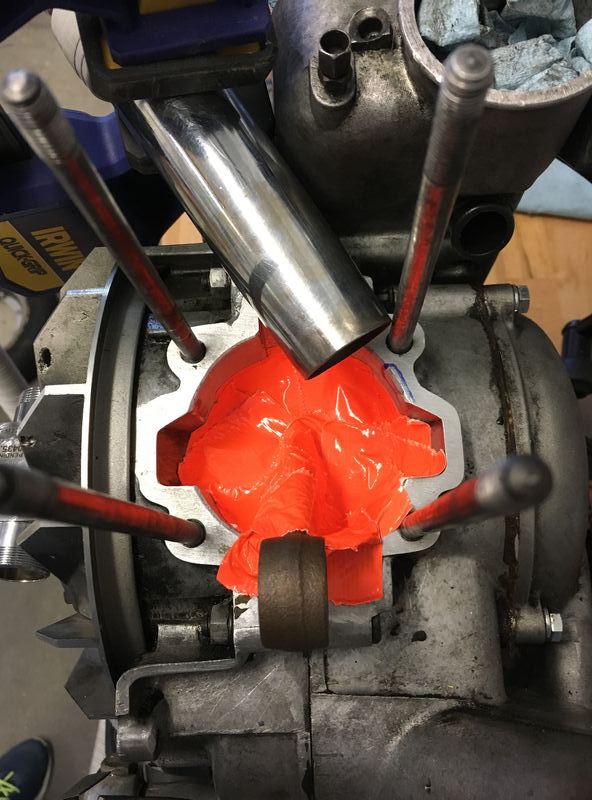
Directors choice to go with orange to signify danger.
Little JB Weld work.  Note few stripped threads at top of case on front stud hole - caused a bit of delay...
Little JB Weld work. Note few stripped threads at top of case on front stud hole - caused a bit of delay...
Added a bit at the back as well to match cyl and gasket
Seen better days.
Seen better days.
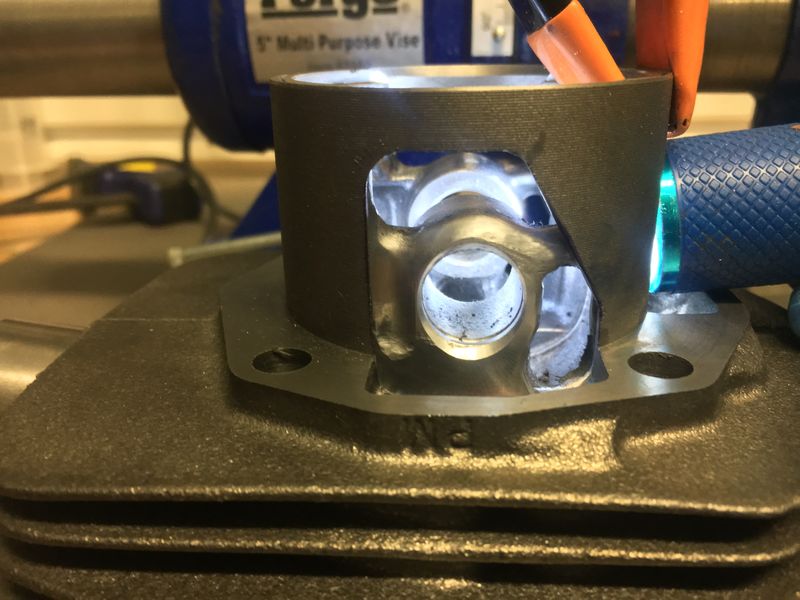
Instead of gouging front of piston - I cut away a bit of the cyl skirt - hey - I accidentally already practiced this once!   This gave me an extra 2mm of depth (diagonal cut on side transfer port area)
Instead of gouging front of piston - I cut away a bit of the cyl skirt - hey - I accidentally already practiced this once! This gave me an extra 2mm of depth (diagonal cut on side transfer port area)
Channel will cut off transfer and last blast will come through hole.
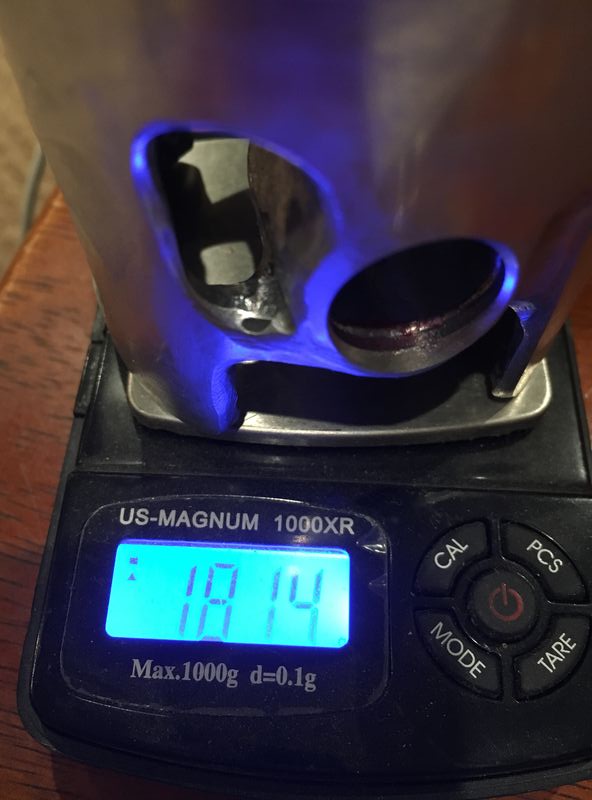
Dropped some weight ~ 13g
Piston at BDC
Piston at BDC
@hibbert avatar
UTC

Molto Verboso
Vespa
Joined: UTC
Posts: 1984
Location: California
 
Molto Verboso
@hibbert avatar
Vespa
Joined: UTC
Posts: 1984
Location: California
UTC quote
nice job on the welding Charlie
@ginch avatar
UTC

Veni, Vidi, Posti
74 Super, 75 Super, PX project, LML off-roader and '66 Blue Badge Smallframe
Joined: UTC
Posts: 10355
Location: Ballarat VIC, Australia
 
Veni, Vidi, Posti
@ginch avatar
74 Super, 75 Super, PX project, LML off-roader and '66 Blue Badge Smallframe
Joined: UTC
Posts: 10355
Location: Ballarat VIC, Australia
UTC quote
Looking good!
OP
@charlieman22 avatar
UTC

Nedminder
62 VBB1T Round Tail W/ leaner sidecar
Joined: UTC
Posts: 4927
Location: california
 
Nedminder
@charlieman22 avatar
62 VBB1T Round Tail W/ leaner sidecar
Joined: UTC
Posts: 4927
Location: california
UTC quote
Port timing targets for my build - weigh in!
Thanks Hibbert/Ginch - having some fun!

Alright y'all, time for some opinions.
Went to a couple machine shops today in my area - found my guy.
Single man shop.
40 years of experience.
History hot rodding alphas and Datsuns - so something to bond over...
Had some cylinders on the machine that he was decking...
New his stuff - and great guy. Good find!
Now the question is - how much...

To get as accurate read as possible - I bolted the cylinder on and whipped out my buzwangle.
I've calculated what the measures would have been from top of cyl.
Here are the numbers:

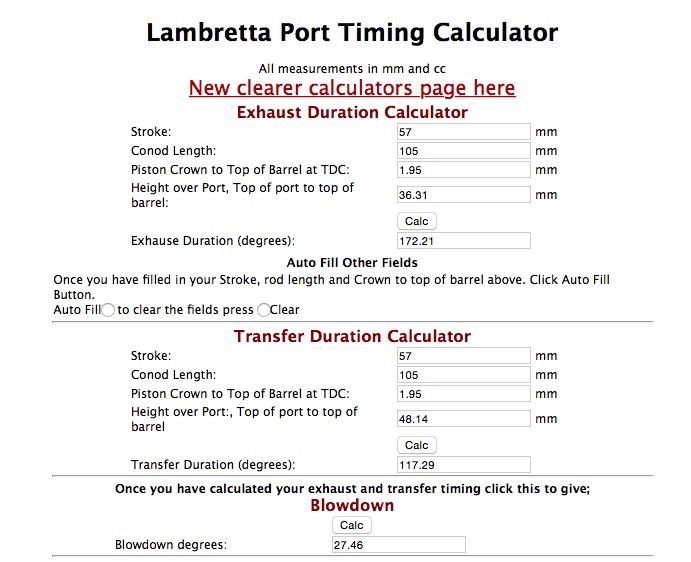
With 1.5 MM packer lift
Inlet 117.3 (48.14)
Ex 172.2 (36.31)
PBT 1.95
Squish 2.75

So...

Option A - leave it alone - lower transfers, wider resonance band big ass squish (?)

Option B - fix squish by decking 1.75
With 1.5 MM packer
Inlet 117.3 (46.44)
Ex 172.2 (34.56)
PBT .2
Squish 1.0

Option C- take 1.75 off top of cyl and lift additional .2 (1.7 total lift)*
Inlet 118.11 (46.24)
Ex 173.03 (34.36)
PBT .20
Squish 1.00
Blow down 27.46

* 1.7 lift means I have to use two gaskets. seems leak prone.

I like the idea of no head gasket - mostly cause the only one I have is 1mm...
Above numbers all assume I don't use one.
Guy felt confident he could nail what ever I wanted removed from head accurately.

Below - totally unrelated:

I have to decide what to do about the cylinder stud that is stripped.
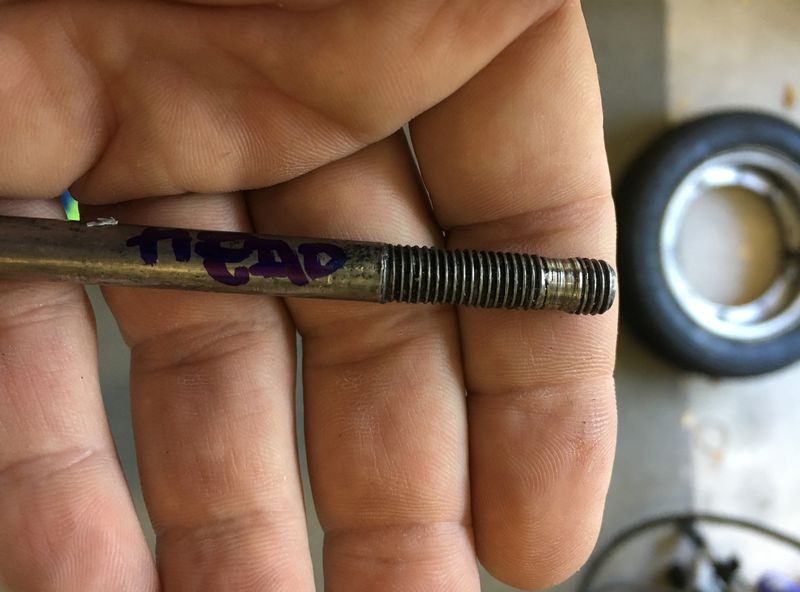
Turns out... my head studs are all 8mm - not 7mm as stock.
I kinda like that - however... they also turned down the threads at the head end to be 7mm... so that they could fit through the head...
ingenuitive...

Need some advice here.
Do I take an 8mm and turn down threads?
Do have have machine shop boar 8MM holes and use 8MM studs?
Holes in head seem to be tapered...
Can't be the first person here...

Thanks!

-CM
UTC

Jet Eye Master
PX221 MHR heavily tuned, PX200 O tuned, PX181 M1XL tuned, PX166 tuned a quite bit and some motorbikes
Joined: UTC
Posts: 5465
Location: London UK
 
Jet Eye Master
PX221 MHR heavily tuned, PX200 O tuned, PX181 M1XL tuned, PX166 tuned a quite bit and some motorbikes
Joined: UTC
Posts: 5465
Location: London UK
UTC quote
All looking good. Piston turned out well.

Can you not just drill the head to 8mm and fit all new cylinder studs?
charlieman22 wrote:
Jack - thanks for weighing in.
This puts my timings at:
Ex 164.5 (36.7mm measured)
In 108.97(48.15mm measured)
If these measurements are correct, then your buzzwangle is not. They don't line up. Good you have a guy to deck the cylinder.
From these measurements you need a 2.20mm packer to get 118.

Trying to not have a head gasket is ok but will compromise flexibility.
OP
@charlieman22 avatar
UTC

Nedminder
62 VBB1T Round Tail W/ leaner sidecar
Joined: UTC
Posts: 4927
Location: california
 
Nedminder
@charlieman22 avatar
62 VBB1T Round Tail W/ leaner sidecar
Joined: UTC
Posts: 4927
Location: california
UTC quote
Quote:
If these measurements are correct, then your buzzwangle is not. They don't line up.
True - my buzwangle does bend a bit to the right - but I've always felt it was feature rather than a fault.

You've jumped back on me a few steps.
Quote:
Ex 164.5 (36.7mm measured)
In 108.97(48.15mm measured)
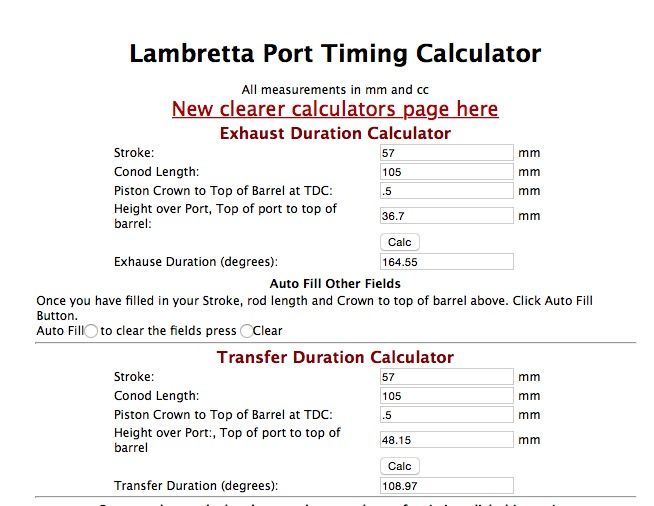
Those measures were taken previously - see below image - my calc shows they are on target tho.
Took them with the buzwangle.
Then measured physically.
Got within .3mm so thought pretty dead on.
Does something look amiss on my inputs?

In any event:
In order to give best number to nail this - since I would like to avoid using the head gasket - I went back and measured as carefully as possible today

Let's focus on these (taken with buzwangle - measures shown in () are just calculated not actually taken):

With 1.5 MM packer lift
Inlet 117.3 (48.14)
Ex 172.2 (36.31)
PBT 1.95
Squish (2.75)

See below - again - am I inputting some wrong info?

Thanks for $.02 on bore head.
Seems simplest.
Was just surprised to find all the head holes are tapered on Malossi/Polini/ & Piagio. Perhaps its to remove from casting mold? Would have thought those were bored. Thought maybe there was some magic to the taper I needed to know about before just boring out to 8mm.
Calc using numbers that give 164.5 & 108.97
Calc for today's measure with 1.5 base packer in place and torqued down
@socalguy avatar
UTC

bodgemaster
63 GL, 76 Super (x2), 74 Primavera (x2), 79 P200, 06 Fly 150
Joined: UTC
Posts: 7962
Location: So Cal
 
bodgemaster
@socalguy avatar
63 GL, 76 Super (x2), 74 Primavera (x2), 79 P200, 06 Fly 150
Joined: UTC
Posts: 7962
Location: So Cal
UTC quote
Since a straight bolt on isn't happening, let's at least make sure everyone's on the same page with your measurements before your machine guy starts grinding away on your new cylinder.
Quote:
With 1.5 MM packer lift
Inlet 117.3 (48.14)
Ex 172.2 (36.31)
PBT 1.95
Squish (2.75)
1. I'm assuming by "inlet" you mean "transfer timing" - correct?

2. So with a 1.5mm base gasket under the cylinder, your transfer ports are opening 48.14mm from TDC, correct?

3... and staying open for 117° of rotation. Correct?

4... ditto exhaust port, opens 36.31mm from TDC, stays open for 172.2°. Correct?

5. And, with the 1.5mm packer, at TDC your piston sits 1.95mm below the top of the cylinder. Correct?

Modern Vespa is the premier site for modern Vespa and Piaggio scooters. Vespa GTS300, GTS250, GTV, GT200, LX150, LXS, ET4, ET2, MP3, Fuoco, Elettrica and more.

Modern Vespa is made possible by our generous supporters.

Buy Me A Coffee
 

Shop on Amazon with Modern Vespa

Modern Vespa is a participant in the Amazon Services LLC Associates Program, an affiliate advertising program designed to provide a means for sites to earn advertising fees by advertising and linking to amazon.com


All Content Copyright 2005-2026 by Modern Vespa.
All Rights Reserved.


[ Time: 0.0175s ][ Queries: 4 (0.0093s) ][ live ][ 343 ][ ThingOne ]