Hi folks!
Been posting replies in another thread, but thought it might be getting a bit off the original topic, so......
I've got a 1979 P200 (early one) with a bad regulator (4-wire; must be made of unobtainium!) Tested at the headlight socket, and got about 20V at idle, and revving it up nearly pegged the meter on a 50v AC scale....
So what's a scooterist to do? Are there alternatives to replacing the (nearly impossible to find) regulator with one of the same type? Can the 5-wire type be used? They seem to be a lot more common....
Also, this scooter's been fitted with a reed valve and Malossi carb (it's a 30), but it looks like the air bellows won't reach the horn it's supposed to hook onto.... and there's no air filter, either... this bothers me more than a little.... What do folks do in this kind of situation? Are there air filters that would fill the gap?
Thanks for any assistance anybody can offer!
Joe
|
OP
|
|
|
UTC
quote
Definitely sounds like you've got a bad regulator.
We do have new ones for sale. They're not the original style, but we've modified them to fit and plug right in. Give a call if you'd like to go this route. |

|
OP
|
UTC
quote
Thanks, Max!
Thanks for the reply, and the good service on the phone, Max!
I Forgot to address the other issues: Air bellows ,which says "Malossi" on it, appears to be too short to reach from the carb to the body... Is there some technique involved here? Should I be able to stretch it that far (about an inch or so)? Additionally, there's no air filter on the carb.... Is there a better solution than duct tape and foam rubber? Thanks!! |
|
Moderibbit

1980 P200E - "Old Rusty", 1976 ET3 Primavera
Joined: UTC
Posts: 8891 Location: Atlanta, GA |
UTC
quote
Re: Thanks, Max!
JoeP833 wrote: Thanks for the reply, and the good service on the phone, Max! I Forgot to address the other issues: Air bellows ,which says "Malossi" on it, appears to be too short to reach from the carb to the body... Is there some technique involved here? Should I be able to stretch it that far (about an inch or so)? Additionally, there's no air filter on the carb.... Is there a better solution than duct tape and foam rubber? Thanks!! |
|
OP
|
UTC
quote
Air filter for Malossi carb
Thanks for the reply!
Would it be acceptable to just stick an air filter on the carb (assuming one can be found), and forget about the bellows? Will the air flow under the cowl be sufficient? Joe |
|
Moderibbit
1980 P200E - "Old Rusty", 1976 ET3 Primavera
Joined: UTC
Posts: 8891 Location: Atlanta, GA |
UTC
quote
Re: Air filter for Malossi carb
JoeP833 wrote: Thanks for the reply! Would it be acceptable to just stick an air filter on the carb (assuming one can be found), and forget about the bellows? Will the air flow under the cowl be sufficient? Joe |
|
|
UTC
quote
the bellow serves as a clean, COOL air supply
the air under the cowl is to hot for the carb to operate properly, imho the air from the frame is cooler and plentyfull always run with the proper equipment |
|
Moderibbit
1980 P200E - "Old Rusty", 1976 ET3 Primavera
Joined: UTC
Posts: 8891 Location: Atlanta, GA |
UTC
quote
jimmyb865 wrote: always run with the proper equipment |
|
OP
|
UTC
quote
Air filter for Malossi 30 carb
Thanks, folks!
So are there others on here with the Malossi setup on P200's? What do you do for an air filter? |
|
|
|
|
UTC
quote
jimmyb865 wrote: the malossi carb i had(never installed)had a bellow that fit the p that is the bellow you want, no need for filter, you could throw some k+ n foam in the bellow if you wanted 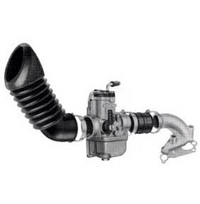
|
|
OP
|
UTC
quote
Oops! Sorry jimmyb865! Should have mentioned that it's got a reed valve, not the original rotary.... Bet that makes a difference!
|
|
|
UTC
quote
not really, same bellow i believe
call max at motorsport/scooters west and ask if he has a articulated bellow for the malossi carb-reed/rotary |
|
OP
|
UTC
quote
Electrics again...
Ok, so back to the electrical issue... Replacement regulator (and headlight assembly, by the way) arrived today, all plug-n-play, no problem there, everything fit just as it should, but.... 20 seconds after starting the scooter, the headlighht blows again! Now what? I've heard of a "clipper diode" that is somehow supposed to shunt everything over 13V to ground, but it seems like addressing the symptom, rather than the cause... Anybody got any ideas as to what I might check next? Where to measure, and what to expect? I'm in the dark (in more ways than one!)...
Joe |
|
|
UTC
quote
I talked with my mechanic and he said to regulate your headlight circuit with an inline regulator or clipper diode.
|
|
OP
|
UTC
quote
Headlight issues
ok, so here's what I know: There's a 3-prong connector on the back of the headlight with black, brown & green wires going to it. I have surmised that the black wire is common, the green is high-beam, and the brown is low-beam. Measuring between the brown-black and the green-black pairs with nothing connected to the connector (except the test leads, of course!) gives similar results on both circuits - about 13-14 at idle, and around 22 "at speed"....
Will I need to put a clipper diode in both the green and the brown wires? How does it connect? Is there some place I can introduce the clipper diode that will protect both circuits? Thanks for your help!! Joe |
|
|
UTC
quote
from what i remember that aint right
everything up front should be 12volt horn, bulbs, ect check that the two violet wires are not crssed at the rectifier http://www.scooterhelp.com/electrics/wiring/VSX1T.USA.after.pdf |
|
OP
|
UTC
quote
Thanks, JimmyB, but my regulator has only one violet wire, one pink., and 2 yellow going to it (originally, anyhow - Now the violet's taped off, and then regulator's been replaced with one from Max that doesn't use the violet wire... I'm assuming there's no difference between the 2 yellow ones.. doesn't matter which one goes on which terminal on the regulator?
Thanks again, Joe |
|
|
UTC
quote
JoeP833 wrote: Thanks, JimmyB, but my regulator has only one violet wire, one pink., and 2 yellow going to it (originally, anyhow - Now the violet's taped off, and then regulator's been replaced with one from Max that doesn't use the violet wire... I'm assuming there's no difference between the 2 yellow ones.. doesn't matter which one goes on which terminal on the regulator? Thanks again, Joe |
|
|
UTC
quote
You want to put the clipper diode on the headlight wire going to the headlight switch, so that the both the high beam and the low beam wires coming out of the switch are regulated.
|
|
|
UTC
quote
Motorsport Scooters wrote: You want to put the clipper diode on the headlight wire going to the headlight switch, so that the both the high beam and the low beam wires coming out of the switch are regulated. your lamp is powered straight from the lighting coil |
|
OP
|
UTC
quote
Ok, thanks, guys! I found (in the junction box on the engine) where the purple wires are joined from the stator to the wire that ultimately goes to the headlight switch, providing juice to either the low-beam or high-beam light... Measured there, and got the same too-high readings I'd gotten elsewhere, so... that's where the diode goes, I reckon....
Yellow wire teed into the purple wire? Black wire to ground? And I guess with a longer screw, I could just mount the diode itself on top of the junction box... On to other mysteries.... Is the taillight supposed to be on without the scooter running? Trying to figure out which is taillight and which is brake light... The one that comes on with the switch is the one with the white wire going to it (took it apart to see... ) ... Thanks again for sharing your experience with an old fart who's been away from Vespas for 20 years, and suffers from CRS... Joe |
|
OP
|
UTC
quote
Further observations
Just checked, and the front brake-light switch is working fine, just the back one's not doing anything...
|
|
OP
|
UTC
quote
Update
Okay, progress! Both brake-light switches are working now! Amazing what 25 years in a basement will do to electrical contacts! Now all that remains to getting it ready to ride is the headlight issue! Am I really just one clipper diode away from having a functional scooter?!?!? Cool!
|
|
|
|
|
UTC
quote
Motorsport Scooters wrote: You want to put the clipper diode on the headlight wire going to the headlight switch, so that the both the high beam and the low beam wires coming out of the switch are regulated. |

|
|
UTC
quote
This site has good diagrams. The difference seems to be the two yellow wire stator type regulator vs the other regulator that has the "A" terminals that seems to provide the AC clipping for the headlight via the purple wire.
Notice the purple wire feeds to the switch, then to the headlamp on the earlier model without going through the regulator. It seems it was designed for the stator coil to not overload the lamp without regulation, as on the old balanced systems. http://www.scooterhelp.com/electrics/pages/VSX1T.p200.html If your Vespa has this unregulated headlamp stator output, then a clipper from the purple wire to ground should work. Since the output is AC, it takes two Zener diodes in series or a special package. If your headlight blows, all the stator output goes through the Zeners to ground. That is equal to or greater than your headlamp wattage, and that generates a good bit of heat. They would need to be sized accordingly. The two Zeners tied together are at the bottom of this page. You could make it from lower wattage Zeners, and just keep a spare in case they blew. A single Zener would be seen as a short to ground during one half cycle. http://www.allaboutcircuits.com/vol_3/chpt_3/11.html A simpler fix might be to install a series voltage dropping resistor in the purple wire. It would make for a dimmer headlamp at idle, but keep the voltage down at higher rpms. Your scoot may not have the original stator with the appropriate lighting coil for the unregulated system. You could install behind the engine cowl, tapping into the purple wire at the junction box. I use Electronics Distributing, on Brookstown Ave for electronic parts. I live about 30 miles west of you. |
|
OP
|
UTC
quote
society wrote: Motorsport Scooters wrote: You want to put the clipper diode on the headlight wire going to the headlight switch, so that the both the high beam and the low beam wires coming out of the switch are regulated. Anyhow, I'm gonna try one in my headlight ciruit to see if that will prevent headlight blowing, which, thus far, has been 3 times, all within seconds after installation.... Good luck! Joe |
|
OP
|
UTC
quote
blackbart wrote: This site has good diagrams. The difference seems to be the two yellow wire stator type regulator vs the other regulator that has the "A" terminals that seems to provide the AC clipping for the headlight via the purple wire. Notice the purple wire feeds to the switch, then to the headlamp on the earlier model without going through the regulator. It seems it was designed for the stator coil to not overload the lamp without regulation, as on the old balanced systems. http://www.scooterhelp.com/electrics/pages/VSX1T.p200.html If your Vespa has this unregulated headlamp stator output, then a clipper from the purple wire to ground should work. Since the output is AC, it takes two Zener diodes in series or a special package. If your headlight blows, all the stator output goes through the Zeners to ground. That is equal to or greater than your headlamp wattage, and that generates a good bit of heat. They would need to be sized accordingly. The two Zeners tied together are at the bottom of this page. You could make it from lower wattage Zeners, and just keep a spare in case they blew. A single Zener would be seen as a short to ground during one half cycle. http://www.allaboutcircuits.com/vol_3/chpt_3/11.html A simpler fix might be to install a series voltage dropping resistor in the purple wire. It would make for a dimmer headlamp at idle, but keep the voltage down at higher rpms. Your scoot may not have the original stator with the appropriate lighting coil for the unregulated system. You could install behind the engine cowl, tapping into the purple wire at the junction box. I use Electronics Distributing, on Brookstown Ave for electronic parts. I live about 30 miles west of you. 30 miles? would that put you in the Statesville area? |
|
OP
|
UTC
quote
P200 Wiring diagrams
Hi again folks! I've seen many references to the scooterhelp.com wiring diagrams, but found them too small for my old eyes... here's a link to another site that has a larger, and to my eyes, clearer diagram for my early P200.... http://24.101.58.15:8080/schematic/p200e_1.pdf
Hope it helps others with old eyes! Joe |
|
|
UTC
quote
Re: P200 Wiring diagrams
JoeP833 wrote: Hi again folks! I've seen many references to the scooterhelp.com wiring diagrams, but found them too small for my old eyes... here's a link to another site that has a larger, and to my eyes, clearer diagram for my early P200.... http://24.101.58.15:8080/schematic/p200e_1.pdf Hope it helps others with old eyes! Joe the other site will do as well |
|
|
|
OP
|
UTC
quote
Motorsport Scooters wrote: You want to put the clipper diode on the headlight wire going to the headlight switch, so that the both the high beam and the low beam wires coming out of the switch are regulated. Joe |
Modern Vespa is the premier site for modern Vespa and Piaggio scooters. Vespa GTS300, GTS250, GTV, GT200, LX150, LXS, ET4, ET2, MP3, Fuoco, Elettrica and more.

Shop on Amazon with Modern Vespa
Modern Vespa is a participant in the Amazon Services LLC Associates Program, an affiliate advertising program designed to provide a means for sites to earn advertising fees by advertising and linking to amazon.com
Modern Vespa is a participant in the Amazon Services LLC Associates Program, an affiliate advertising program designed to provide a means for sites to earn advertising fees by advertising and linking to amazon.com
[ Time: 0.0098s ][ Queries: 4 (0.0027s) ][ live ][ 343 ][ ThingOne ]