Fabio Dougie wrote:
I also think that 50cc riders get maligned
|
UTC
Ossessionato
'09 S50, '79 V50
Joined: UTC
Posts: 2105 Location: Heidelberg, Germany |
|
|
|
UTC
quote
Fabio Dougie wrote: I also think that 50cc riders get maligned |
|
OP
|
UTC
quote
HotboxDeluxe wrote: Fabio Dougie wrote: I also think that 50cc riders get maligned So..... who has any info for me on Contra Springs and how they work??? . |
|
|
|
OP
|
UTC
quote
cheekythomas wrote: I might have a few sets of clutch springs to donate to the cause... I'll take a look I'd be very grateful !!! |
|
Ossessionato
07 GTS250(RIP), 07 LX150, Several Lambrettas
Joined: UTC
Posts: 2836 Location: Raleigh, NC |
UTC
quote
So how many miles have you put on this new kit?
I ask, as the break-in period for a two stroke is vastly different, and critical for a long top end life. You asked way back about moving the needle clip. Raising the clip will lean out your fuel/air mixture at mid throttle ranges, and possibly make you run too hot. Changing your main jet will effect your 3/4 to WOT throttle ranges. Again, going smaller means leaner (hotter). There's that fine line between performance and failure. It always seems runs the best, right before you seize. Sounds great what you are doing, but be cautious during the initial 500 miles or so, on your top end. Pay good attention to your plug color at different ( and consistent) throttle ranges. |
|
OP
|
UTC
quote
starreem wrote: Sounds great what you are doing, but be cautious during the initial 500 miles or so, on your top end. Pay good attention to your plug color at different ( and consistent) throttle ranges. Thanks for the info on the needle clip position, I'm currently at the middle of the five clip positions and it seems to be the best so far, on the Main Jet I'm currently testing between a 82 and a 85, this weekend if the weather is good (belted in down here all week!) I'm going to do some plug chops on the two jets at WOT to see which returns the best plug condition. A question for you.......do you know whether....if I run at WOT and chop the plug, or if I run at say middle throttle if the plug chop will reflect this (hope I've explained this ok!?!?) Thanks for the great comment - I'll click the 'thumbs-up' for this one too !! . |
|
UTC
Veni, Vidi, Posti
2007 Vespa LX 190, 2011 LXV150ie
Joined: UTC
Posts: 8758 Location: Annapolis, MD, USA |
|
|
Veni, Vidi, Posti
2007 Vespa LX 190, 2011 LXV150ie
Joined: UTC
Posts: 8758 Location: Annapolis, MD, USA |
UTC
quote
Fabio Dougie wrote: Silver Streak wrote: Yes, your thinking is correct. The set of clutch springs should have manufacturer's data included that shows at what rpm the clutch will engage for each color, so it shouldn't be entirely trial and error. . |
|
OP
|
UTC
quote
Silver Streak wrote: Not exactly. A set of performance clutch springs will always be stiffer than stock. When I was tuning my old Vino 50 2-stroke, I bought a packet of Malossi clutch springs that had three different colors: white, yellow, and red, if I recall correctly. There were instructions included that indicated that the white was just a bit stiffer than stock, the yellow stiffer still, and the red the stiffest. It also indicated the clutch shaft rpms at which each would engage. I wound up using the yellow. Yes I see - got you now, I'm understanding the theory of clutch springs better now. I've been doing a bit of research tonight.... am i right in thinking that the purpose of the contra/contrast spring is to return the rear pulley to closed when you decelerate, and the idea of upgrading it is to make the gearing revert back as soon as possible when slowing down so that it can accelerate again when required? . |
|
Moderibbit
1980 P200E - "Old Rusty", 1976 ET3 Primavera
Joined: UTC
Posts: 8891 Location: Atlanta, GA |
UTC
quote
Fabio Dougie wrote: if I run at WOT and chop the plug, or if I run at say middle throttle if the plug chop will reflect this (hope I've explained this ok!?!?) There's certainly no harm in checking. ⚠️ Last edited by xantufrog on UTC; edited 1 time
Positive
|
|
OP
|
UTC
quote
xantufrog wrote: Fabio Dougie wrote: if I run at WOT and chop the plug, or if I run at say middle throttle if the plug chop will reflect this (hope I've explained this ok!?!?) There's certainly no harm in checking. Once again fantastic input!! Yes I think i'll plug chop the main at 82 and 85 (I've got both of those jets) and then I've got a 78 and 86 just in case. Then I'll plug chop the mid throttle which I gues will be a lot trickier to do but this should tell me whether the position of my needle clip is correct im assuming ? Clicked 'Thumbs-up' button for this one ! Thanks once again . |
|
OP
|
UTC
quote
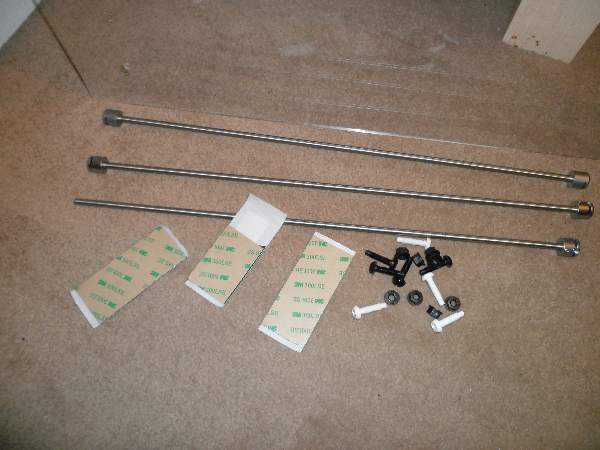
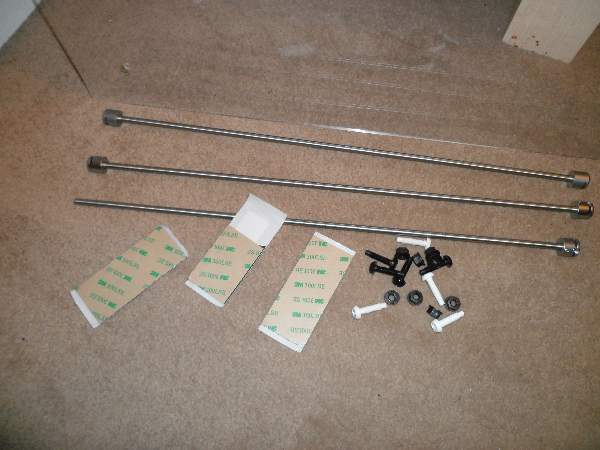
Fabio wrote: The list of 6 'tinkerings' that I'm thinking about.... Number 2 - Flyscreen - They're hellishly expensive - I think I'm going to fashion one myself, I'm just looking around all of the local diy shops to get some ideas of best materials So I'm starting to get the materials together now, some semi-flexible perspex sheet approx 1m by 0.5m, metal rods (with a very nice finish) which I'm hoping to bend to the correct shape, complete with some end 'fixings' which tighten on by a smallish internal screw which I'm hoping should fit nicely inside the headset tubes that accept the standard tubed flyscreen (it looks like a 15mm internal diameter tubing) , plastic fixings (I've got some chrome ones somewhere too !), rubber adhesive strips. And the good news is that they were all sourced absolutely FOC. Going to try to make up the screen this weekend if I get the chance. .
Here's the components so far !
|
|
Ossessionato
07 GTS250(RIP), 07 LX150, Several Lambrettas
Joined: UTC
Posts: 2836 Location: Raleigh, NC |
UTC
quote
I'm not familiar with your particular carburetor, but generally speaking, two stroke carbs have separate fuel/air circuits operating at different throttle positions. It has nothing to do with engine speed, nor RPM. The idle jet is effective from zero throttle to 1/8 opening, the slide from 1/8-1/4 opening, the needle and needle jet from 1/4-3/4 and the main from 3/4-full open throttle. You should try and determine each on the same stretch of road, and only change one thing at a time. Work through each throttle position till you are happy.
Unlike some other advice here, you really should concentrate on the needle and needle jet, as the mid range of throttle is where you will spend most of your time driving around town. You'll have a better chance of seizing there rather than WOT, since you likely will spend far less time at WOT. And with an oil injected carburetor, it really doesn't matter where you start. On pre-mix engines, the idle circuit will have some bearing on how much lubrication is getting to the cylinder head and piston when you roll off the throttle, like a downhill slope. That is prime seize time on a premix engine, so you really want to get that right first thing. The easiest and most consistent way is on the stand. Start with the biggest or richest jet/position you have. If you don't experience rich bogging, you may be too lean, and need to keep going bigger, til you do bog rich. If your largest jet/position bogs rich, work your way back down to the largest jet that will not bog on the stand. You will likely find the next smallest jet will be good with a load on the engine. |
|
OP
|
UTC
quote
,
Stareem... Thanks again for that, great info in your post!! So start with the 85/86 main jet and run WOT and check the plug, if ok then run at 3/4, 1/2 and 1/4 and check each to set the needle, then idle to 1/4 to set the idle air mix screw?? Have I understood this correctly? Thanks once again + Kudos for you ! , |
|
Ossessionato
07 GTS250(RIP), 07 LX150, Several Lambrettas
Joined: UTC
Posts: 2836 Location: Raleigh, NC |
UTC
quote
If you can't get the engine to bog rich with that 86, you should keep going bigger till you do, then work back to one that does not bog. A real plug chop actually requires chopping the plug open to read the color of the insulator at the bottom of the insulator.
http://www.kawtriple.com/mraxl/carb/plugchop.htm My personal opinion is plug chops are not the best thing for your engine. I mean think about it, you're driving along, engine screaming at the highest rpm you can achieve at a given throttle opening, an engine that requires fuel/oil for cooling and lubrication and you suddenly stop all fuel flow? Repeatedly over and over again? I personally don't do plug chops. I pull the plug every now and then on a cool engine, to look at the condition of the gap and color, but I don't have the real inclination, time and plugs to be cutting one open every 1/4 mile. Besides, pulling a hot plug from a hot engine is a recipe for sheared plug threads in that aluminum head. Like I said earlier, I'm not familiar with that particular carb, but working with WOT for your main jet, 1/2 throttle for your needle/needle jet, and between 0-1/8 for your idle mix is sufficient. No need to waste your time at 3/4 and 1/4 throttle. |
|
Moderibbit
1980 P200E - "Old Rusty", 1976 ET3 Primavera
Joined: UTC
Posts: 8891 Location: Atlanta, GA |
UTC
quote
I respect your perspective on this, Starreem. You know more about these things than me.
But I have two concerns: 1) he probably will be riding 1/2-WOT quite a lot. This is a kitted 50, not a 150+. Even with the 70cc kit, he'll probably have the throttle position over 1/2 a LOT of the time, particularly on hills. That's the nature of the ride on these little guys (and part of what makes them fun to scream around on). To that end, I really would stress he do a WOT plug chop. 2) building off of my first point, maybe plug chops aren't the easiest thing on the cylinder head threads, but he's got a scoot with a cylinder kit, a different carburettor, and an exhaust which was never made for the scoot to begin with. On a stock-ish scooter, I could see the "why bother" perspective with the plug chop, but why leave things to chance when you're cooking along at WOT (~47mph) on a scoot with mixed aftermarket performance components throughout the top end? I'm still gonna vote for plug chops at both the WOT and mid-range throttle position to feel safe. |
|
Ossessionato
07 GTS250(RIP), 07 LX150, Several Lambrettas
Joined: UTC
Posts: 2836 Location: Raleigh, NC |
UTC
quote
I never advised to ignore WOT when trying to jet this beast, nor leaving anything to chance.
Allow me re-phrase my thoughts: Proper jetting at all throttle positions is critical, this includes WOT, 1/2 and 0-1/8 opening. Each of these positions utilize a different carburetor circuit and can be operated at each of those positions with somewhat reliable consistency. Judging the mix based on plug color is subjective at best, if you do not intend to actually chop off the threads of the spark plug. Relying on subjective and possibly inaccurate criteria leaves the door open to be running on the lean side and not even know it, at all times. What then happens if a small air leak develops? Possible seizure. Without a CHT or EGT gauge, one has to rely on the sound a feel of a bike while it is running. Looking at a spark plug is not the best way to learn that feel and sound of a well running engine. Starting off with a confirmed rich position at WOT, 1/2, and 0-1/8 throttle; and working backwards, ensures a reasonable air/fuel mix without the concern for seizing or damaging the top end in the actual process of experimenting to figure out the proper jetting using subjective, incomplete and possibly damaging methods. |
|
Moderibbit
1980 P200E - "Old Rusty", 1976 ET3 Primavera
Joined: UTC
Posts: 8891 Location: Atlanta, GA |
|
OP
|
UTC
quote
.
Starr/Xantu I think that you have both cleared this up for me in my mind. I now know what I've got to do with this and I am truly grateful to both of you for your detailed comments - fantastic. You are both credits to ModernVespa, and your balanced discussions are exactly the reason why i started this thread. I read a lot of information on the internet prior to embarking upon this project - some good - some bad - some very ugly, but the the information that I have received from contributors to this thread is invaluable. It surprises me more and more each and every day how ModernVespa members are generous with their time and ideas, don't mind voicing their constructive opinions and also don't mind explaining in detail to relative beginners like myself the basics or indeed very advanced topics. For this I can only commend you whole heartedly and offer you my sincerest thanks. I'm thinking that because this thread will be read by a lot of members of MV and also by other scooter enthusiasts all over the net as MV syndicates their post out to the WWW, that I might start a WIKI (What I Know Is) section to this thread summarising all of the learning that I have made about 50cc tuning. It would be a great resource for others, what are everybody's thoughts? . |
|
OP
|
UTC
quote
.
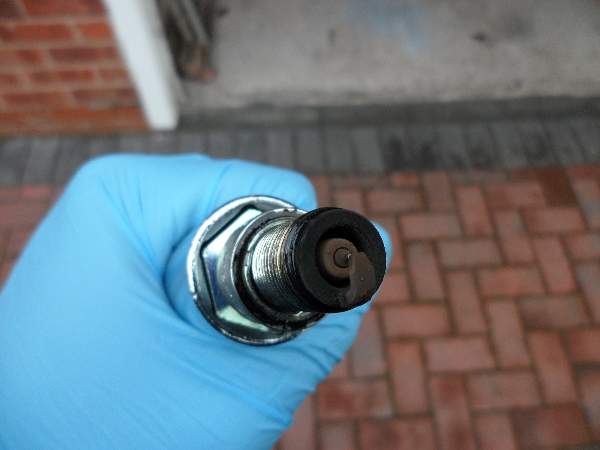
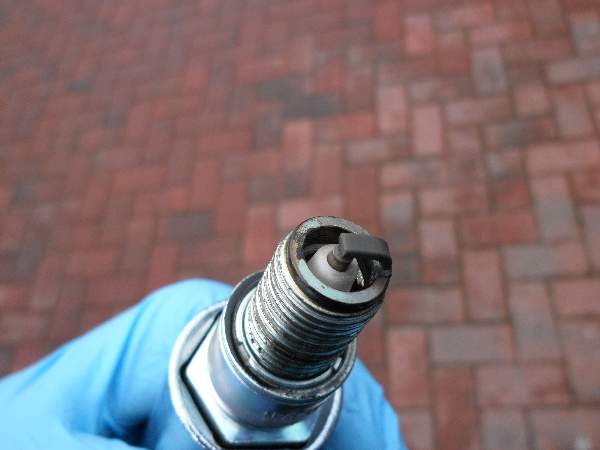
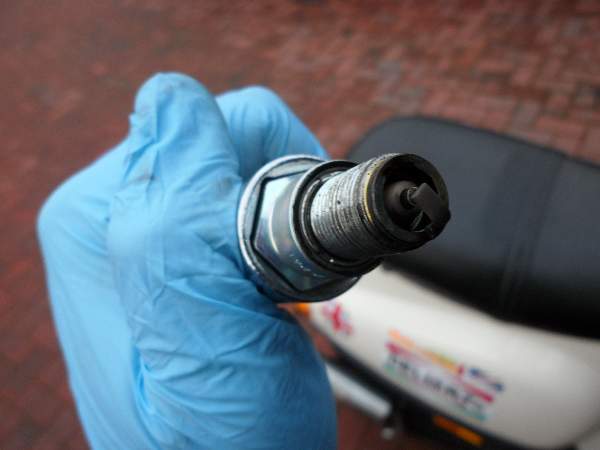
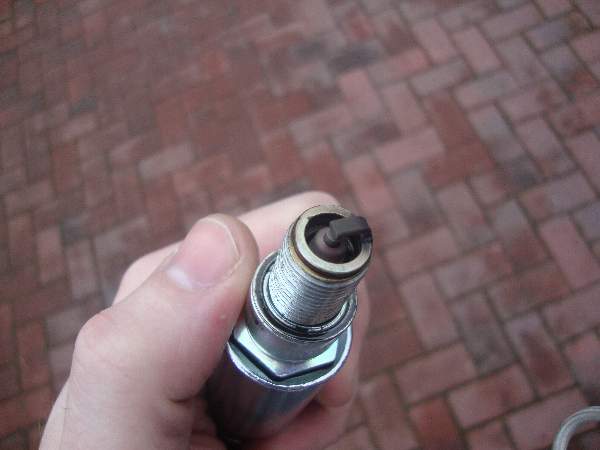
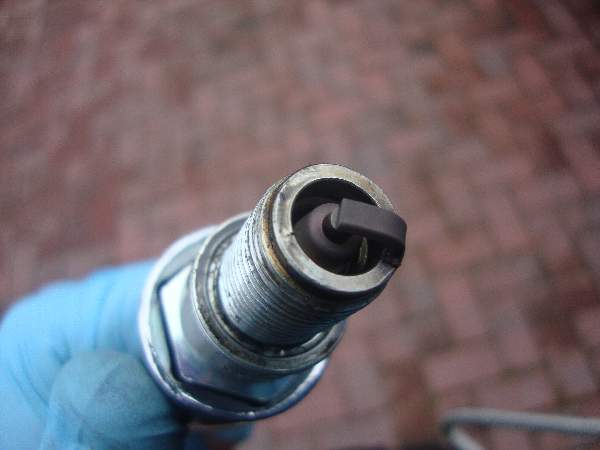
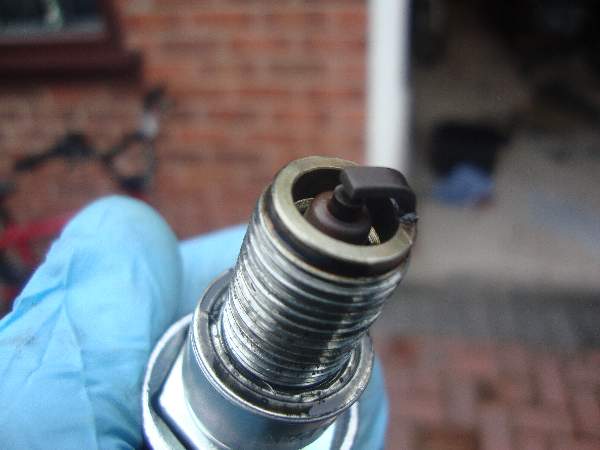
Ok, here's the plug chops at WOT... The first photo is of the Iridium spark plug that I was running with mainly a 85 Main Jet, this is the condition of it as I pulled it after it had warmed up, I didn't want to warm the scoot up on the new plug in case it altered the results of the tests. It has been the main spark-plug for a while and the photo is of it uncleaned in any way. A new plug was then fitted to the scoot. Tried a 82 MJ first, The photo is below and is very pale so I'm guessing way too lean, also the scoot didn't run right at WOT!!! Got a bit concerned at one stage!! Cleaned the plug to the best of my abilities. Then tried a 86 MJ, the plug was showing black when I pulled it which appears too rich, also the scoot didn't seem to accelerate correctly and felt lazy and boggy. 3rd photo down. Cleaned the plug again. Fitted the 85 MJ and it immediately felt a whole lot better to ride, revved well, accelerated well, and WOT top speed felt good too, Photo 4 shows the plug's appearance. For consistency of results, each time I rode the same circuit of roads including a stretch of dual carriage where I wound the scoot up till the speedo read 55mph. .
Original Iridium running 85 MJ
82 MJ - too lean.
86 MJ - felt lazy and boggy - too rich.
85 MJ - this looks more like what I expected, and rode well too.
|
|
OP
|
UTC
quote
.
And here's the plug after running it at 1/2 to 3/4 throttle, needle clip at the middle of the 5 positions. Looks good do you think? .
85 MJ ran 1/2 to 3/4 throttle
|
|
OP
|
UTC
quote
,
And how the plug looks at between idle to 1/8 throttle - just pootering at 5mph-ish up and down the street. Still a nice bronish colour so I'm guessing its all ok across the rev range after my tinkerings. .
85 MJ - between idle and 1/8th thottle.
|
|
Moderibbit
1980 P200E - "Old Rusty", 1976 ET3 Primavera
Joined: UTC
Posts: 8891 Location: Atlanta, GA |
UTC
quote
~*Edited to remove confusion*~
And of course, when doing any plug chop, you should sustain the throttle position for a long time to give time for the plug to take on the color of the current mixture. http://www.incriminators.com/plugchop.html Anyway, based on the seat-of-the-pants results, you had an 86, was rich and boggy, but you like the 85. That's cool. I'd try an 84 and maybe an 83 as well, though. Assuming you were doing the plug chop correctly, the 85 looks too rich at all throttle positions depicted (but we need to look down inside towards the base of the insulator along with at the top, and internet pictures are never great). It should be more of a tan/cardboard than the dark Godiva chocolate I'm getting the sense of. What felt "wrong" about the 82 at WOT? ⚠️ Last edited by xantufrog on UTC; edited 1 time
|
|
OP
|
UTC
quote
.
Xantu Not quite sure I'm following what you're saying about using old plugs, from all the articles I've seen it says to warm the scoot up on the old plugs and then swap them out and replace them with new plugs for the chops?? In addition, the links that both you and Starreem sent me seem to advocate this?? Starreem sent... http://www.kawtriple.com/mraxl/carb/plugchop.htm Xanti sent........ http://www.incriminators.com/plugchop.html So I'm a little confused, I ran the scoot for a good 5 miles in a manner consistent with the throttle opening for that test and ended with a good period at each required throttle setting before doing the plug chops, and the coloration changes for each chop (one darker and then one lighter) suggest that the new plug is ok to use? Also I've read that 2T air cooled and 2T liquid cooled should show differing results, this is the extract I found that seems to make sense to me.... "when i do a plug chop i don't look at the color of the ceramic insulator around the center electrode, you should look at the part where the metal shell of the plug meets with ceramic insulator, it should be a nice chocolate brown color for air cooled engines & a light brown color for liquid cooled engines." The 85MJ seems to feel a whole lot better than the others that I've got 82 and 86, I might ride it a while and chop again to see what condition the plug is then in ans then perhaps got to an 83 or and 84, what do you think? Anybody with some extra experience of this want to contribute to add to the views? . |
|
OP
|
UTC
quote
.
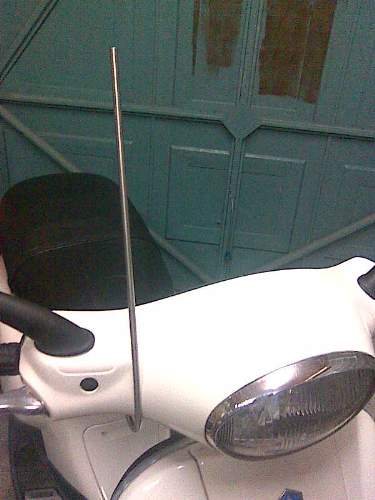
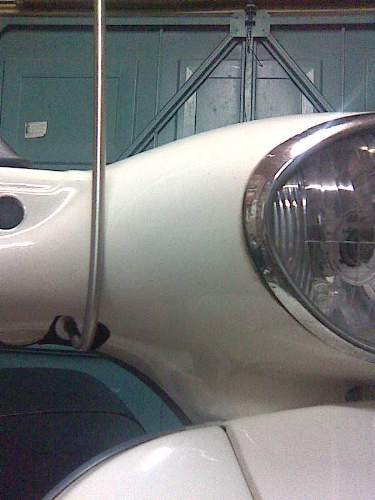
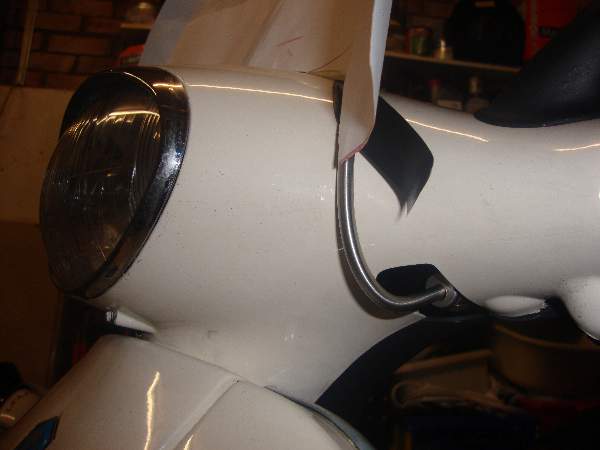
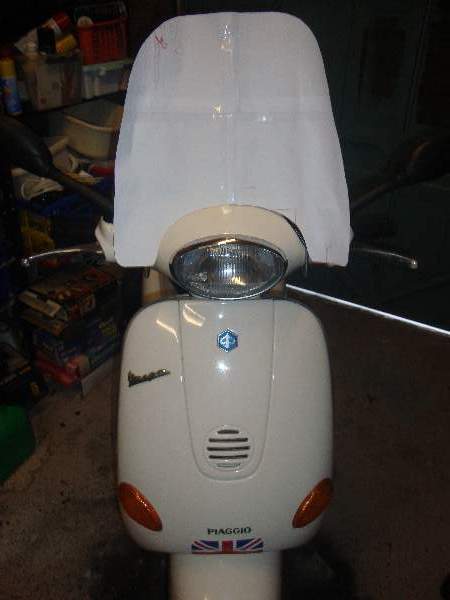
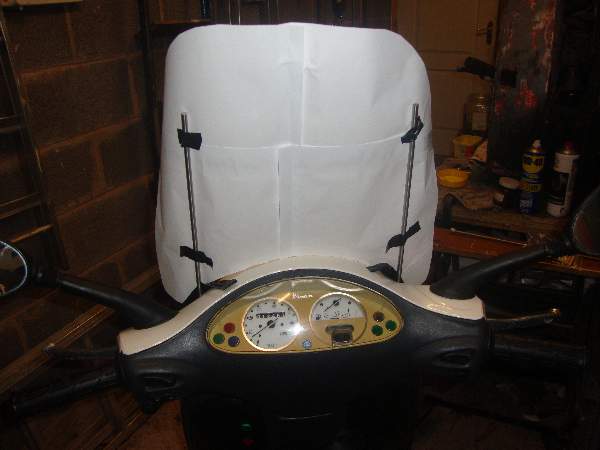
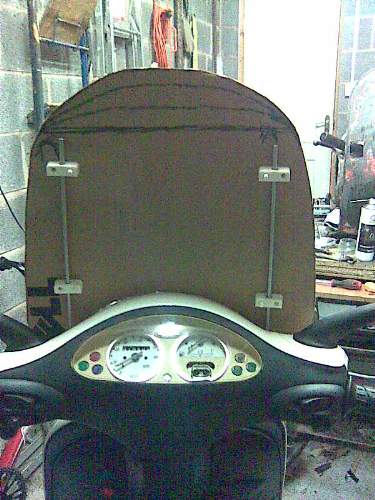
Ok.... a bit more info on the Flyscreen build. You've seen the components list... now I've started to make the screen up. Took the rods and formed them into the correct shape, and drilled out and modified the rod end connectors (whatever were they used for before????). Temporarily fitted them into the scooter's accessory tubes on the headset, these will just need drilling and tapping with a thread so that I can tighten the flyscreen rods into the headset tubes for safety/stability. Just in the process now of making a paper template to get the shape of the screen correct and then when I'm happy i'm going to transfer that onto some very stiff card (almost wood like) and cut it out and fix it all together and give it a few careful dry runs out on some quiet roads, to hopefully get a balance between the drag effect being reduced and the ungainly size of the screen from an aesthetics point of view. Ive also thought about trying to replicate a wind-tunnel effect with some smoke and a large fan of some sort so that i can visually see the flow of air over the flyscreen. I could do with some input on the shape of the screen, any ideas would be appreciated. Here's the photos... .
Components
One rod made up
From a different angle
Rod "fastened" temporarily while I mock up the screen's paper template.
Initial idea for the shape of the screen - first thoughts...looks a bit too big/fat to me!
Rear view
|
|
OP
|
UTC
quote
.
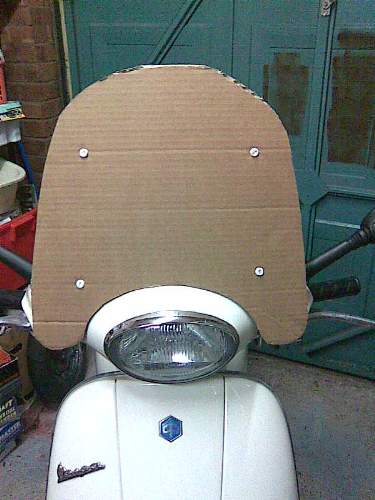
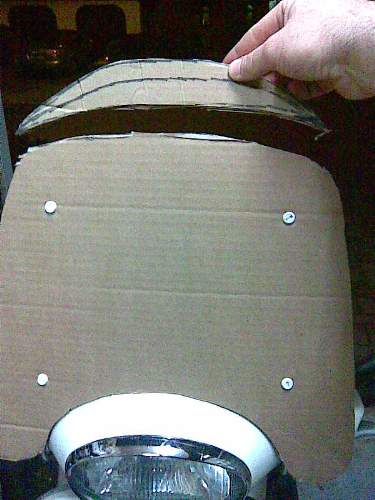
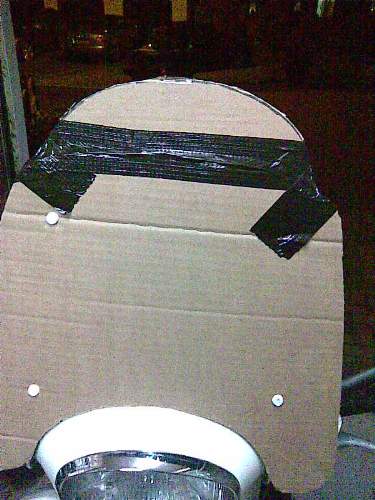
Here's some more fly-screen stuff.... Took the paper pattern and transferred the shape onto some very stiff cardboard, cut it out and fitted it to the scooter using some plastic fasteners that did the trick (on a temporary basis). Rode the scooter up and down the street to see how sturdy it was - all seemed okay - in-fact very sturdy - really pleasing! First trip out - took the scoot up to dual carriageway speed, a lot warmer around the torso but the initial height of the screen meant a lot of wind buffeting around the eyes at speed (>50mph). Came back home and trimmed about 2 inches off the top of the cardboard to see if it altered the dynamics. Took it out again and almost immediately had to turn for home as the screen forced cold air straight into my eyes and face even at low speeds - not good. Added a bit more card to the top of the screen and fixed it with duct/gaffa tape, and took it back onto the dual-carriageway. the scoot felt a lot more civilised, there was still some buffeting but greatly reduced, noise levels were reduced and it felt warmer, however it felt a bit surreal as the engine noise was for some reason a lot quieter too, not sure whether I liked it to be honest. Good news was that I almost hit the top peg on the speedo on one section of the dual carriageway that has a very slight incline, so I'm thinking this was about 59mph (indicated). Positives: better top end speed, also it seemed to accelerate a little better above about 35mph, quieter, warmer, I suspect a bit more economical too but I suppose only time will confirm this. Negatives: A bit aesthetically challenged, felt a bit sterile too - couldn't feel the wind at all and engine sounds very muffled, not so nice to listen to. So next step.... replace the card with the Perspex/Acrylic, and also warm it the the oven and bend it to shape which may solve some of the aesthetics and also the wind noise. .
Very Stiff Cardboard bolted on !!!
Height of screen for the first run.
Cut 2 inches off the top for run number 2 - a disaster.
Added about 4 inches - much better - 59mph !
|
|
Moderibbit
1980 P200E - "Old Rusty", 1976 ET3 Primavera
Joined: UTC
Posts: 8891 Location: Atlanta, GA |
UTC
quote
Very cool! I can only assume the 59mph is indicated, not actual? Still, that would be ~53 or 54, which is just plain spiffy for a $1,000 70cc scooter
|
|
Moderibbit
1980 P200E - "Old Rusty", 1976 ET3 Primavera
Joined: UTC
Posts: 8891 Location: Atlanta, GA |
UTC
quote
Hi Fabio - you're right, those links suggest using new plugs. This goes against what the wrenchers I hang around with claim, about needing some deposits to pick up color, and I've observed that for a given tuning I'll get a "new plug" look on early chops but more distinct coloring on later ones... I dunno. Not the first time the guys I hang around with were wrong
Regarding good plug color - coffee and cream is perfectly acceptable on an air-cooled 2-stroke. People often tune richer than necessary for safety. The air-cooled vs liquid cooled difference you refer to comes down to the fact that a liquid cooled engine could suffer higher ignition temperatures without seizing, so it might be safely jetted a bit leaner for performance and fuel economy. It's hard to tell from your pics because we are looking at photos on the internet and it's the wrong part of the plug to examine, but it looks quite a bit darker than "coffee and cream" and could probably be leaned out safely. However, I was just making an observation, and I'd go with Starreem's advice and roll with the seat of the pants experience you are getting. And it it IS a bit too rich, so what? Lose a couple mpg for a perfectly acceptable ride and peace of mind, right? |
|
OP
|
UTC
quote
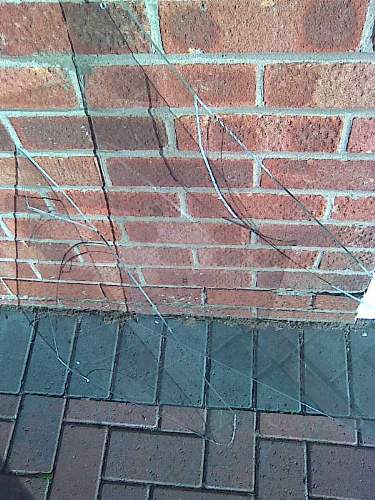
xantufrog wrote: Very cool! I can only assume the 59mph is indicated, not actual? Still, that would be ~53 or 54, which is just plain spiffy for a $1,000 70cc scooter Yes it was an indicated speed and only just briefly. However the flyscreen "experiment" has come to an temporary end today after this happened.... Too brittle I guess, I'll have to see what else I can find to fashion the screen from. No loss anyway as it cost me nothing to source this piece of plastic, just have to keep trying, and find some other more suitable material lying fallow.
Oh No! Its broke!!!!
|
|
UTC
Veni, Vidi, Posti
2007 Vespa LX 190, 2011 LXV150ie
Joined: UTC
Posts: 8758 Location: Annapolis, MD, USA |
|
|
Veni, Vidi, Posti
2007 Vespa LX 190, 2011 LXV150ie
Joined: UTC
Posts: 8758 Location: Annapolis, MD, USA |
UTC
quote
It's likely not the material... it's the fact that it was under constant stress from bending. Perspex (Plexi) or Lexan (polycarbonate) can easily be bent over a form with a little heat, and that will relieve the stresses.
Jess had an old thread about making a windscreen by temporarily attaching it to a simple wooden form and heating it in a household oven. You can probably find it with a search. I've also heard of folks having good results using a heat gun or hair drier. |
|
OP
|
UTC
quote
.
Yes - just had a quick look at that thread. Very interesting indeed. I'll get some more material and have another go at it. . ⚠️ Last edited by Fabio Dougie on UTC; edited 1 time
|
|
OP
|
UTC
quote
xantufrog wrote: Hi Fabio - you're right, those links suggest using new plugs. This goes against what the wrenchers I hang around with claim, about needing some deposits to pick up color, and I've observed that for a given tuning I'll get a "new plug" look on early chops but more distinct coloring on later ones... I dunno. Not the first time the guys I hang around with were wrong Regarding good plug color - coffee and cream is perfectly acceptable on an air-cooled 2-stroke. People often tune richer than necessary for safety. The air-cooled vs liquid cooled difference you refer to comes down to the fact that a liquid cooled engine could suffer higher ignition temperatures without seizing, so it might be safely jetted a bit leaner for performance and fuel economy. It's hard to tell from your pics because we are looking at photos on the internet and it's the wrong part of the plug to examine, but it looks quite a bit darker than "coffee and cream" and could probably be leaned out safely. However, I was just making an observation, and I'd go with Starreem's advice and roll with the seat of the pants experience you are getting. And it it IS a bit too rich, so what? Lose a couple mpg for a perfectly acceptable ride and peace of mind, right? I think I'm going to try a smaller Main Jet, 85 slightly too big, 82 too small, so I'm going to plump for an 84 to be on the safe side. . |
|
|
UTC
quote
going back to the cdi and rev limit. i dont know if this cdi may give that bit more power
http://www.adrenalin-pedstop.co.uk/p/Piaggio_NRG_Gilera_Runner_unlimited_CDI_unit_from_Athena-678.aspx |
|
OP
|
UTC
quote
wacka wrote: going back to the cdi and rev limit. i dont know if this cdi may give that bit more power http://www.adrenalin-pedstop.co.uk/p/Piaggio_NRG_Gilera_Runner_unlimited_CDI_unit_from_Athena-678.aspx Yes it looks good, but at £41 + the cost of postage its out of my budget - i'm trying to go as fast as I can for as cheap as I can. I still would be interested to know whether the standard CDI unit is restricted in some way though. . |
|
OP
|
UTC
quote
.
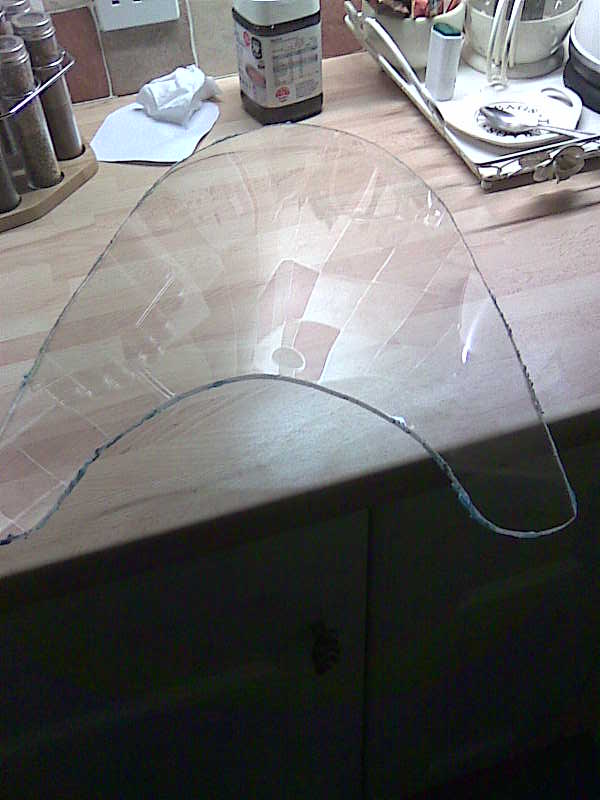
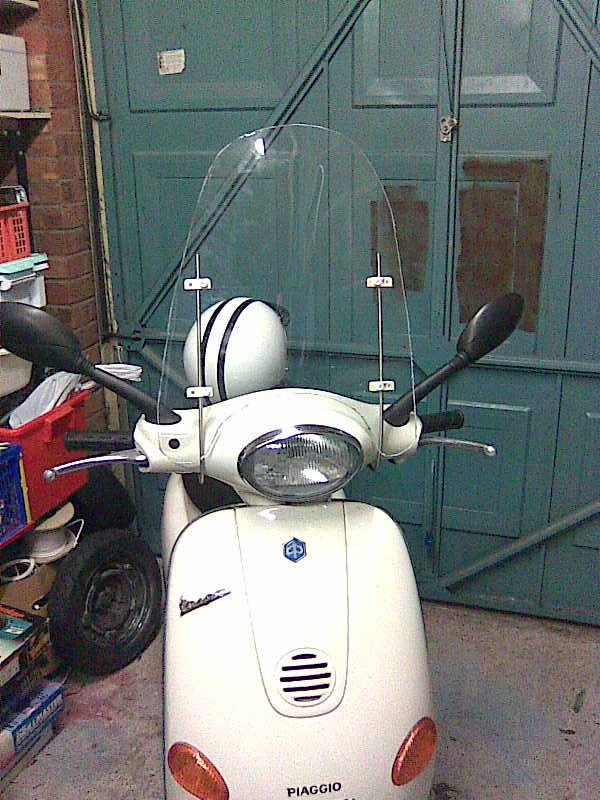
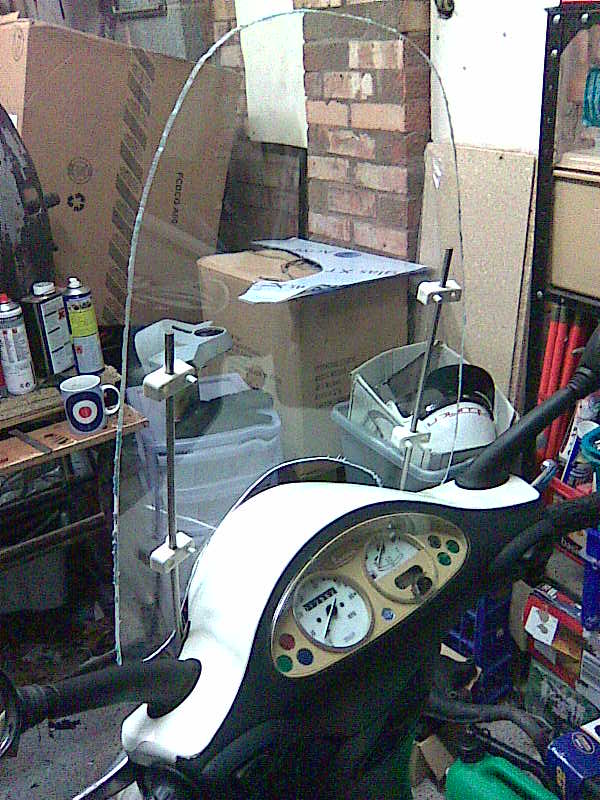
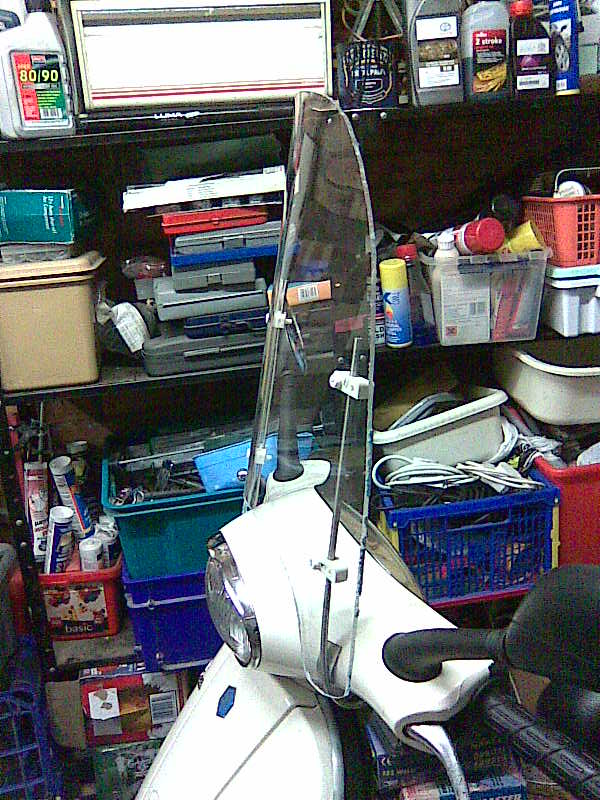
Flyscreen update..... Sourced some slightly different material today, chose an off-cut piece of a 4mm thick perspex called Acryglass XT. It cut well with a "zigsaw" using a fairly thick-ish blade and I used a heat-gun to shape it to the profile that I required, I left it a bit taller than I originally designed so I could cut it down if I wanted it any smaller once I'd tested it. Once it was made up I fitted it temporarily to the scoot to test it and once again got up to 59mph (again only for a very short while), the scoot felt better than with the cardboard 'test' screen and I noticed that I felt a lot warmer, my torso and face were completely shielded and considering that its almost freezing here tonight I was very very chuffed. Wind noise was reduced and the whole ride felt more civilised, and now that the screen is clear I can see through as well as over, its very stable and I need now to just finish off the edges and refix it with some padding and some slightly diff bolts/nuts. Overall I'm very pleased, at the weekend I might just do another video of a short ride out with the screen on and with the new 84 Main jet if it lands in time, also I might have some more news on the 130/70-10 tyre this week with any luck. Total cost of the flyscreen project - £10. .
Cut and formed
Fitted, just needs balancing up.
Rear View
In Profile.
|
|
|
UTC
quote
Fabio Dougie,
I frequent a few other scooter forums and on one of them(Modern Buddy) there is a thread there where two businesses(teamed up) are modifying a 50cc buddy scooter.I thought I would bring it to your attention cause they have gone into great detail,step by step,complete with pics of this project.I thought about you here with your project and thought maybe there could be some info. or tips,ideas, references etc for you.If not well thats ok too since the build is awesome on it's own.Hopefully you enjoy it should you check it out.Good luck Man! http://www.modernbuddy.com/forum/topic15709.html |
|
OP
|
UTC
quote
Scootover wrote: Fabio Dougie, I frequent a few other scooter forums and on one of them(Modern Buddy) there is a thread there where two businesses(teamed up) are modifying a 50cc buddy scooter.I thought I would bring it to your attention cause they have gone into great detail,step by step,complete with pics of this project.I thought about you here with your project and thought maybe there could be some info. or tips,ideas, references etc for you.If not well thats ok too since the build is awesome on it's own.Hopefully you enjoy it should you check it out.Good luck Man! http://www.modernbuddy.com/forum/topic15709.html Scootover... Thanks for the link to this site - I've not seen it before and it has lots and lost of useful info for me, particularly re the variator/clutch/springs/rollers. I'll click the 'thumbs-up kudos' button on your post for this !!! Hehe! - I'm thinking that the two guys with the buddy are spending a whole load of money on their "tinkerings", how well would they do with the budget I've set myself I wonder - Hehe! Thanks once again. . |
|
OP
|
UTC
quote
.
Just had a thought...... One of the main limiting factors of the ET2 is the wheel size, or more importantly the rolling circumference..... ET2/ET4/Zip - 10inch Runner - 12inch NRG - 13inch Buddy - ??? This I assume has a big effect on the gearing. I've got to find an inexpensive way of increasing the gearing on my ET2 - I can see this as an area for major increases in the top speed of my ET2 (assuming the engine can push the extra geared speed). Any Ideas? Has anyone changed the wheels on a ET2/ET4/Zip for bigger wheels, and if so was it successful, what was involved, what else needed to be changed, was it expensive to do?? Any thoughts gratefully received.... . |
|
|
UTC
quote
While I have done much tinkering with my scoot, I have a 150 and I haven't been too concerned with top speed. though it seems to me that there are two major speed limiting factors on any vehicle.
The first being the rpm limit of the engine, this can be fixed by CDI tuning and hoping you don't cause failure or crank mods that allow for higher rpm's and CDI mods, the later of which is outside the realm of cheap. This can also be circumvented via transmission mod or other "gearing" alterations, but this leads to the second limit. That being the maximum power the engine makes and the power required to overcome aerodynamic drag. When the drag equals the engine power you have hit your max speed. You have seen this with your wind screen. For my penny-pinching upgrade to increase top speed I would fabricate an aerodynamic cowl and make some other aero mods. First of which would be foot pegs at the back of the scoot and a...for lack of a better word...chest rest (think of crotch rocket gas tank) to lay on, there by reducing both the drag coefficient and the frontal area of the bike. You could probably make a frontal cowl if not a full cowl for $50 from fiberglass, though I am guessing since I haven't worked with fiberglass that much. |
|
UTC
Veni, Vidi, Posti
2007 Vespa LX 190, 2011 LXV150ie
Joined: UTC
Posts: 8758 Location: Annapolis, MD, USA |
|
|
Veni, Vidi, Posti
2007 Vespa LX 190, 2011 LXV150ie
Joined: UTC
Posts: 8758 Location: Annapolis, MD, USA |
UTC
quote
beberly37 wrote: While I have done much tinkering with my scoot, I have a 150 and I haven't been too concerned with top speed. though it seems to me that there are two major speed limiting factors on any vehicle. The first being the rpm limit of the engine, this can be fixed by CDI tuning and hoping you don't cause failure or crank mods that allow for higher rpm's and CDI mods, the later of which is outside the realm of cheap. This can also be circumvented via transmission mod or other "gearing" alterations, but this leads to the second limit. That being the maximum power the engine makes and the power required to overcome aerodynamic drag. When the drag equals the engine power you have hit your max speed. You have seen this with your wind screen. For my penny-pinching upgrade to increase top speed I would fabricate an aerodynamic cowl and make some other aero mods. First of which would be foot pegs at the back of the scoot and a...for lack of a better word...chest rest (think of crotch rocket gas tank) to lay on, there by reducing both the drag coefficient and the frontal area of the bike. You could probably make a frontal cowl if not a full cowl for $50 from fiberglass, though I am guessing since I haven't worked with fiberglass that much. |
|
OP
|
UTC
quote
Silver Streak wrote: I think you are bumping up against the horsepower limitations of your engine in its present state of tune, and I doubt gearing changes would buy you much, if anything. Silver... I think you are probably right.... My thoughts are that I'm at the top of the engines current capacity, but I'm thinking that perhaps some small changes in the gearing may get me over 60-ish, and then I think that's probably the top of the scale. . |
Modern Vespa is the premier site for modern Vespa and Piaggio scooters. Vespa GTS300, GTS250, GTV, GT200, LX150, LXS, ET4, ET2, MP3, Fuoco, Elettrica and more.